Fresno: The Seven5 Tutorial
This tutorial builds a blog engine called Fresno. The world does not need more blog engines; Seven5 needs a tutorial based around an application that has the minimal amount of application-specific things for you to learn.
You can ask questions about the tutorial in the Seven5 Google Group.
Typography in this document
This document writes commands that you type like this:
$ ls -l /The dollar sign is used to indicate you should type the command at the shell, and expected output is placed immediately afterward.
We use the same “boxed” typography for code samples that are taken from Go code in the tutorial.
In cases where we are referring to a file or directory that is part
of the tutorial, we will write it like this: somefile.go. We also will
indicate environment variables the same way: (PAGER).
Meta-information, asides, and commentary about the tutorial itself is written like this:
We would love to have somebody test out this tutorial on Windows and provide a pull request with the necessary changes to get it working.
Prerequisites
This document assumes you understand
- Go
- the basics of the web (HTTP, HTML, CSS, a bit about the DOM)
- the basics of git
- a tiny bit of PostgreSQL and SQL
- a tiny bit of curl
Further, this tutorial assumes you are developing on a Mac using OSX or a similar-enough Linux installation.
You will need to have a version of Go installed that is at least 1.6. The
recommended way to do this on OSX is via brew, for example
brew install golang.
The PostgreSQL version doesn’t matter too much, probably anything from 9.1 to 9.5+ will work fine. This tutorial was developed on PostgreSQL 9.5.
Any version of curl should be fine.
One time bootstrap
This section does not need to be repeated once it is done.
You have to have go installed on your system, version 1.6 or higher.
This tutorial was written with go 1.6.2. If you installed go in a
“non-standard” place you’ll need to know what you want GOROOT to be set to. If you don’t know what GOROOT is, it’s likely you can ignore it.
You can test that your go environment is set up properly like this:
$ go version
go version go1.6.2 darwin/amd64
Note that the last words can vary if you are on a different operating system or architecture from the author. “linux/amd64” is another common value for Linux users.
We use gb to build this tutorial. You don’t need any configuration
to use gb but you will need to insure its installed in your PATH
somewhere. It is recommended to just put gb in the same directory as
your go binaries.
A quick way to build gb on your system, assuming go is in your path,
is like this:
$ mkdir -p /tmp/gb/src
$ cd /tmp/gb
$ GOPATH=`pwd` go get github.com/constabulary/gb
$ GOPATH=`pwd` go install github.com/constabulary/gb
$ ls -l bin/gb
-rwxr-xr-x  1 iansmith  staff  11237452 May  9 14:10 bin/gb
You can now copy the binary /tmp/gb/bin/gb to any directory in your PATH.
Setting Up For Seven5 Development
You need to layout the source code in a particular way to make various Go- and Seven5-related tools happy. Create a directory structure for this tutorial like this:
$ cd
$ mkdir tutroot
$ cd tutroot
$ mkdir -p vendor/src
$ mkdir src
This document will refer to the directory tutroot created first
above as TUTROOT. If you plan to set an actual environment variable
to this value (rather than just doing the substitution in your head
as your read) you must set TUTROOT to absolute path, not a
relative one–it must start with a slash.
Clone the tutorial repository and the other seven5 packages:
$ mkdir -p $TUTROOT/src/github.com/seven5
$ cd $TUTROOT/src/github.com/seven5
$ git clone https://github.com/seven5/tutorial.git
$ git clone https://github.com/seven5/seven5.git
$ git clone https://github.com/seven5/gb-seven5.git
$ cat enable-tutorial.tmpl
and examine the output of the last command. That is the enable script and you should put in this file any “local” setup that you need to do have the this tutorial work, but also to not break other projects you have on your system.
You should copy this file to your TUTROOT directory and then edit it:
$ cd $TUTROOT/src/github.com/seven5/tutorial
$ cp enable-tutorial.tmpl $TUTROOT/enable-tutorial
Once you are satisfied with the content of the enable script, you should source it into your environment (not execute it):
$ cd $TUTROOT
$ source enable-tutorial
$ go version
go version go1.6.2 darwin/amd64
$ echo $DATABASE_URL
postgres://iansmith@localhost:5433/fresno
The output of the go version should be apropriate for your platform–this
is a test to make sure you have your PATH reasonably set. The output of
the last command should contain your username and the port you have chosen to
use for postgres. This is a sanity check on your other environment variables.
gb and this tutorial
gb is a build tool designed to work with go. It has been extended for this tutorial (and your own projects, if you choose) with a plugin to make building Seven5-based apps easier and faster.
From the previous section, you should have gb installed in your path.
You can verify this with:
$ which gb
/Users/iansmith/go16/go/bin/gb
If that command returns any output, your gb is probably ok.
gb breaks the source code into two parts. The first or primary part is
the code in src and the secondary portion is in vendor/src. The secondary
portion is code that is not what you are working on directly within this project,
it is dependencies of the code you are working on. These dependencies are
“frozen” at a particular version so you can have reproducible builds on different
systems.
For this tutorial, we have included a “manifest” or list of all the dependencies
in the file src/github.com/seven5/tutorial/manifest. You should copy this file
to the vendor area like this:
$ cd $TUTROOT/vendor
$ cp ../src/github.com/seven5/tutorial/manifest .
$ cat manifest
The last command in that sequence shows you the contents of the manifest file. It’s
simply a list of json objects, each describing a particular dependency and version
of that dependency. These are created/updated with gb vendor but for now we are
just going to “reconstitute” all these into your vendor area.
$ cd $TUTROOT
$ gb vendor restore
Getting github.com/codegangsta/inject
Getting github.com/coocood/mysql
Getting github.com/coocood/qbs
...
Now, if you look in vendor/src/github.com you will see many 3rd party packages
that are used by the this tutorial. You can be assured that if you succeeded with
gb vendor, you have precisely the versions you need to run the tutorial successfully.
Building The Fresno Server
For this lesson and all the ones following, we’ll assume that you know
what $TUTROOT is on your system and that you have sourced the
enable-tutorial script into your shell environment. Also, from this point
in the tutorial when we refer to source files that are part of the tutorial
we will say fresno/main.go rather than the much longer
$TUTROOT/src/github.com/seven5/tutorial/fresno/main.go. All the tutorial source
files are underneath $TUTROOT/src/github.com/seven5/tutorial.
Environment variables
All configuration of Seven5 applications is done through environment variables. This makes them twelve factorish and easy to deploy, particularly on heroku.
If you are deeply interested in heroku you may want to take the heroku detour.
Build and run the fresno application locally
$ cd $TUTROOT
$ gb build github.com/seven5/tutorial/...
github.com/lib/pq/oid
github.com/shurcooL/sanitized_anchor_name
...
$ fresno
2015/03/15 18:47:39 DATABASE_URL found, connecting to postgres://iansmith@localhost:5433/fresno
2015/03/15 18:47:39 [SERVE] (IsTest=true) waiting on :5000
You can try going to “http://localhost:5000/” with your browser, but you won’t see much because the server wants to connect to a database and you probably don’t have one ready yet. If the fresno server fails to connect to the database you will get a stacktrace in your terminal.
Add A Database
Most realistic applications need access to a reliable relational store.
Fresno is no exception, so we’ll go ahead and set this up now. As
we showed previously, our enable script sets a DATABASE_URL
environment variable.
PostgreSQL
You’ll need to have a copy of PostgreSQL running on your local system
for development. On a Mac you can do this: brew install postgres
and then follow its directions about how to run the database. On a
Linux system, use your package manager (yum, apt-get, pacman, or similar)
to install the PostgreSQL server.
This document was written with PostgreSQL version 9.5, but other versions in the 9.x series will likely work.
Local database setup
On your local system you’ll need to create the database fresno:
$ createdb fresnoThis is a reasonable sanity check that your database server is up and your settings in the enable script are correct. If everything is working properly, you’ll receive no output from this command.
PSQL
If you are familar with SQL, you can get an SQL prompt with
$ psql $DATABASE_URLon your local system.
Migrations
With a web server, a database, and all our dependencies captured in our git repository, we are now ready to start doing some real development.
Database and migrations
Seven5 uses qbs to provide a thin layer of abstraction for database querying. However, QBS’ migration support is not sufficient for real applications–for example, it does not support changing column names. So Seven5 provides a thin shim to allow migrations to be written in SQL + Go.
We’ll use a migration here to initialize our database with the tables we
want to use, as well as some test data for our app to serve up. When using
Seven5’s support for migrations, you should create a new binary which
will be called “migrate” because its source is in the migrate directory.
How migrations work
You can see the example migrations in
src/github.com/seven5/tutorial/migrate/main.go.
These migrations are just SQL statements wrapped in Go. The table at the
top controls the behavior of the resulting program:
var defn = migrate.Definitions{
    Up: map[int]migrate.MigrationFunc{
        1: oneUp,
        2: twoUp,
    },
    Down: map[int]migrate.MigrationFunc{
        1: oneDown,
        2: twoDown,
    },
}
This table is passed through to migrate.Main which is supplied by Seven5 as an entry point for migration programs.
Each migration should create/modify tables or data in the database and can assume that, if a given migration is run, all previous migrations in the correct order have been run successfully. Any migration function that has a problem should return an error: then the transaction will be rolled back and the database left unchanged.
Probably the simplest migration is the migration from state 1 to state 0, which is the “oneDown” function in this program:
func oneDown(tx *sql.Tx) error {
    // because of foreign keys, order of these drops is significant
    drops := []string{
        "DROP TABLE post",
        "DROP TABLE user_record",
    }
    for _, drop := range drops {
        _, err := tx.Exec(drop)
        if err != nil {
            return err
        }
    }
    return nil
}
If you look at the first up migration, you will notice that the “oneUp” migration creates two sample users and sample posts. This is handy for running tests because you can just assume that if the database is there, these users and posts are present.
Caveat (Qbs data type matching)
When create a table in SQL, you have to create it with the structure (data types and names) that will mesh with Qbs. Generally, this is fairly straightforward as the names are converted from camel case in Go to snake case for PostgreSQL. However, you may need to experiment with the column types to make sure that the structures in Go mate correctly with them. This is less burdensome than you’d expect because the set of types that you can express in the SQL tables is limited.
The next lesson will discuss what structures in Go correspond to the tables created.
Building and running the migrations locally
If you look in TUTROOT/bin you’ll notice that the command we used before
to build fresno also built the migration application. If you make changes
to the migrations and want to build just that application, you can do
so like this:
$ gb build github.com/seven5/tutorial/migrateWhen you want to use the migration application you can migrate up like this:
$ migrate --up
[migrator] attempting migration UP 001
[migrator] attempting migration UP 002
002 UP migrations performed
You may find it interesting to use “psql” (see previous lesson) to look at what’s in the database after you this command.
The reverse migration also works:
$ godep go install tutorial/migrate  # you should have done this above
$ migrate --down
[migrator] attempting migration DOWN 002
[migrator] attempting migration DOWN 001
002 DOWN migrations performed
$ migrate --down
at earliest migration, nothing to do
$ migrate status
current migration number is 000
Again, you may find it interesting to look inside the database at the
result of doing migrate --down. There are options you can pass to the
migrate program to run a specific number of up or down migrations with
the --step flag.
If you have run the down migrations, you’ll have no tables in your database so you’ll want to run the up migration to restore the tables and test data for future lessons.
Serve Up Some Data Through A REST API
We’ve got a web server and a database that has some content in it, so
let’s try to access the post table to see what posts are available.
Preparation for this lesson
As above, make sure you have the database running, run the migrations (it doesn’t hurt to run them again), build the Fresno server, and start it running.
Getting some data
In another shell, use curl to test out the REST API:
$ curl http://localhost:5000/rest/post/1
{
    "Id": 1,
    "Title": "first post!",
    "Updated": "2015-03-21T07:23:19.617131-07:00",
    "Created": "2015-03-21T07:23:19.617131-07:00",
    "Text": "",
    "TextShort": "This is the first post on the site!",
    "AuthorUdid": "df12ba96-71c7-436d-b8f6-2d157d5f8ff1",
    "Author": {
        "UserUdid": "df12ba96-71c7-436d-b8f6-2d157d5f8ff1",
        "FirstName": "Joe",
        "LastName": "Smith",
        "EmailAddr": "joe@example.com",
        "Password": "",
        "Admin": false
    }
}
$ curl http://localhost:5000/rest/userrecord/df12ba96-71c7-436d-b8f6-2d157d5f8ff1
Not authorized (FIND, UDID)
There are two types of resources in this program, posts and users. As you can see from the above, you can read the posts via the REST API but you don’t have the authentication to read the information about Joe Smith. If you are curious, you may find it interesting to try changing the curl command to “curl -v” so you can see the details of the error messages, headers, etc.
Resources
Resources
are the building blocks of
RESTful APIs. It is
customary to name your resource implementations in Seven5 applications
as “FooResource” in the package resource if this provides the API
implementation of the noun “foo”. You can see the implementations of
“UserRecordResource” and “PostResource” in the files
resource/user_record.go
and resource/post.go, respectively.
Note that resource implementations are in different package typically from your main
(fresno/main.go) so they must be capitalized.
The objects to be exchanged over the wire between client and sever,
referred to as wire types in Seven5, are represented as go structures
in the shared package. The shared package is so named because both the
client and server compile it. The combination of the REST resources and
the structures in the shared package define the programmatic API of your
“back end.”
Because our application is simple, we are also going to use these same structures as the data to be represented in the database. This double duty is nice, because it insures that the values exchanged over the wire are “in sync” with the underlying data model, but more complex applications typically need to separate the storage layer (represented by structures in the database) and the wire representation (that is exchanged between client and server).
The wire types
The wire types are the “nouns” in the sense of RESTful API design.
These are are in shared/post.go and
shared/user_record.go and coded
as uppercase, singular nouns (“Post”). Because they are in a separate package,
and because they must be serializable with “encoding/json”, the fields must
be uppercase also.
Here are the two wire types:
type UserRecord struct {
    UserUdid  string `qbs:"pk"`
    FirstName string
    LastName  string
    EmailAddr string
    Password  string
    Disabled  bool
    Admin     bool
}


type Post struct {
    Id         int64 `qbs:"pk"`
    Title      string
    Updated    time.Time
    Created    time.Time
    Text       string
    AuthorUdid string `qbs:"fk:Author"`
    Author     *UserRecord
}
As we touched on in the previous lesson the fields in the structures “UserRecord” and “Post” must match up to the columns in the database tables “user_record” and “post”. The primary key field must be called out to Qbs if the “pk” is a string, and it is good practice to do it in any case, even though Qbs would default to choosing the int64 field Id for Post.
You’ll notice that we do a join on the post’s author to a user record. This is done by default by Qbs at retrieval-time and we’ve just accepted that default here and told Qbs where to put the joined record.
Testing REST on heroku
If you have pushed your code to heroku, you do the same curl command to your heroku instance (substituting your application name):
$ curl https://damp-sierra-7161.herokuapp.com/rest/post/1
[JSON output]
Understanding REST resource “types”
Seven5 exposes two different means of addressing a REST resource. The first is the “traditional” way with a positive integer, as in the example above with the “Post” wire type. This is the normal way of accessing resources in a RESTful API. There are some situations where the “pretty” URLs such as “/rest/post/2” are not desirable because there is a security consideration or you simply do not wish these to be “guessable”. For this situation, you can use a UDID written in the standard hex format, such as “df12ba96-71c7-436d-b8f6-2d157d5f8ff1”.
If you look in the setup of the Fresno application now (fresno/main.go),
you can see where the connection is made between a wire type and a
resource implementation that implements methods (logically) for that
wire type:
    result.base.ResourceSeparateUdid("userrecord",
        &shared.UserRecord{},
        nil, // index
        s5.QbsWrapFindUdid(&resource.UserRecordResource{}, store), // get
        s5.QbsWrapPost(&resource.UserRecordResource{}, store), // post
        nil, // put
        nil) // delete

    result.base.ResourceSeparate("post",
        &shared.Post{},
        s5.QbsWrapIndex(&resource.PostResource{}, store),
        s5.QbsWrapFind(&resource.PostResource{}, store),
        s5.QbsWrapPost(&resource.PostResource{}, store),
        s5.QbsWrapPut(&resource.PostResource{}, store),
        s5.QbsWrapDelete(&resource.PostResource{}, store),
    )
In the above connection of a user record to its implementing resource, we have passed nil in three places to indicate that some “verbs” are not implemented for this resource. You can see the effect of this with curl:
$ curl  http://localhost:5000/rest/userrecord/
Not implemented (INDEX, UDID)
“result.base” in the above code snippets is a Seven5 BaseDispatcher that will parse an incoming request for a URL and dispatch it to the appropriate resource or subresource. The dispatcher has different, but similar looking methods, “ResourceSeparateUdid” and “ResourceSeparate” that indicate if you want to use UDID-based resources or standard integer ones.
The first parameter given to both of these methods is the portion of the URL
space that this resource occupies. This should be singular and lower case;
omitting underscores is also preferred. The second parameter is the
resource’s wire type, and then there are five separate (thus the
“separate” in “ResourceSeparate”) methods that provide the implementation
of the REST methods index, find, post, put, and delete respectively.
Each of these has a unique method signature, except put and delete which
are the same.
The use of the QbsWrapFind is a means of expressing that you want to use Qbs in the implementation of the method, and would like a properly initialized Qbs instance to be part of your method signature.
The use of “QbsWrapFind” or other “QbsWrap*” methods also implies the default behavior for transaction rollbacks, should the implementation panic(). In general, if you use the QbsWrap* wrapper functions you should be able to ignore transactions.
Return values and wire types
If you look in resource/user_record.go you’ll see the
method “FindQbs”, the implementation of the find verb. This method’s
signature is interesting:
func (self *UserRecordResource) FindQbs(udid string, pb s5.PBundle, q *qbs.Qbs) (interface{}, error) {
...
}
The first parameter is the provided udid sent from the client. The second parameter is a collection of “other parameters” that may or may not have been provided by the client (via query parameters, her session, etc) and the last parameter is a Qbs instance for use in looking up the data in the database.
The return values are more murky. Sadly, we cannot get strong typing on the first parameter because it is checked at run-time. This must match the wire type associated with this resource implementation (see above for the association). The latter argument is an error. If that error is of Seven5’s Error type, you can provide the HTTP status code an error message. If it is a different type of error, the client will receive an “internal error” (HTTP code 500) result.
It is perhaps unsurprising that about half of the implementation of the FindQbs method in both UserRecord and Post is error checking and returning. It “seems” that it “ought to be” just a simple database lookup for a Find on a simple resource, but the error checking is required for a real application.
A static site
Let’s look at sending fixed, static files between the client and server.
Preparation for this lesson
As before, you’ll need to have gb installed for this lesson. We are going to build the seven5 extension of gb that facilitates working with the static site files.
You can build the extension with gb (of course!) as we will do below. For
this section, you will also need to have a copy of gopherjs installed and
we’ll do that with go, because it is located in the vendored area and gb
doesn’t like starting builds in vendor.
$ cd $TUTROOT
$ gb build github.com/seven5/gb-seven5
github.com/seven5/gb-seven5
$ GOPATH=`pwd`/vendor go build -o bin/gopherjs  github.com/gopherjs/gopherjs
The commands above install the program gb-seven5 in your $TUTROOT/bin
directory. This is used when you issue a command that starts with gb seven5.
It also puts gopherjs in your $TUTROOT/bin directory.
Static files and Don’t Repeat Yourself
Based on the doctrine of DRY, Seven5 offers some tooling to help you generate web pages. “Vat?!? Generatung veb kontent ist verboten!?!” As was stated previously, this content is not generated by the server itself, but rather is built completely before the server runs, so it does not fall foul of the “no generating content” rule.
An easy way to insure that content does not break the prescription against server-generated HTML is to ask if the server can correctly generate a 304 Not Modified response to a web request for that HTML content. The Go default “serve file” functions are careful to generate 304 for files that are just sitting in a directory… so, relax, everything is fine.
pagegen
HTML files, and to some extent CSS files, are notorious for having repetition in them. Repetition makes things hard to maintain because you can’t make any change “in just one place”. “pagegen” is a tool that lets you keep everything OAOO.
You may have noticed that the program pagegen was installed in your
$TUTROOT/bin directory when you built you built fresno.
The source code for pagegen is in the pagegen/main.go file, which sets some
options
and then calls the
main
provided by Seven5. This pattern of providing an “entry point” that
you can wrap with your own “main()” is used both with pagegen and
migrations in Seven5. In both cases it is arranged this way because
Seven5 has “most” of the logic but allows you to provide your own
“semantics”.
If you examine pagegen/main.go you’ll see a couple of these semantics:
// utility function for generating current year for footers
func year() int {
    return time.Now().Year()
}

// useful in page generation for generating links
func urlgen() shared.URLGenerator {
    return shared.URLGen
}

// this table adds functionality to the "pipelines" you can use in
// Go templates.
var funcs = map[string]interface{}{
    "year":   year,
    "urlgen": urlgen,
}
These two functions are added to the template processing that is done by pagegen.
Building pagegen
If you want build only pagegen, you can do that like this:
$ cd $TUTROOT
$ gb build github.com/seven5/tutorial/pagegen
This builds the pagegen command, and you’ll need to make sure you have a built
copy in your $TUTROOT/bin before continuing. Normally, though, you won’t
need to invoke pagegen directly, but rather the Seven5 extension for gb will
do that.
Building index.html (and other pages)
The directory pages has the static file content that has been
created for the fresno’s web pages. The directory that
is served by the fresno application is static which is the output directory
to pages input. You can check the static directory with the environment
variable STATIC_DIR.
To (re)create the static output from the static input you can pass the name
of the go package that has the structure of a pages directory and a
static directory.
$ cd $TUTROOT
$ gb seven5 github.com/seven5/tutorial
$ ls src/github.com/seven5/tutorial/static/en/web
login.html    login.js      login.js.map  post          signup.html   signup.js     signup.js.map
You’ll see that this directory now has all the “code” associated with the
login page: login.html and the supporting javascript code login.js. The
file login.js.map is a source map file to allow you to do source level
(go) debugging when in a browser. Similarly, you can see all the code associated
with the signup page; there are some additional pages in the post directory.
The “base” or “landing” HTML file for the fresno application is
pages/post/index.html. The JSON data bundle for that page is
pages/post/index.json.
The pages/post/index.html file is:
<!DOCTYPE html>
<html lang="en">
    {{template "BOOTSTRAP_HEAD_SECTION" .}}

<body>
    {{template "PAGE_NAV_BAR"}}

    <div id="blog-parent" class="container">
    {{template "PAGE_ERR_AREA"}}

    <div class="row">
        <div id="login-parent" class="col-sm-offset-8 col-sm-4">
        </div>
    </div>

    <div id="bottom-item" class="row">
    </div>

     {{template "MISC_FOOTER" .}}

    </div> <!--container -->

    {{template "MISC_JSLOAD" .}}
</body>
</html>
The pages/post/index.json file is:
{
    "title":"Fresno",
    "css_page": "/fixed/index.css",
    "js_file" : "index.js"
}
The “template” for our index.html page is “merged” with this JSON blob
to create the final HTML output. If you are familiar with
go templates, these are just Go
templates with the data provided by the JSON file.
The gb Seven5 extension knows about the pagegen application and how to
invoke it to create the html output files, like
static/en/web/post/index.html from the input templates, such as the
one above.
There are a number of “utility” templates in the support directory
pages/support. All the templates found in this directory
(files ending in “.tmpl”) are available to the page being generated. For
example, you can see the definition of the referenced
template BOOTSTRAP_HEAD_SECTION in pages/support/bootstrap.tmpl
and the templates MISC_FOOTER and MISC_JSLOAD in
pages/support/misc.tmpl.
It should be noted that the calls to these “partial templates” are passed
the argument “.” (dot). This is set to the root object of the JSON content
(see pages/post/index.json above) at the start of processing. So
when the bootstrap template is reached, it will have access to the title
and CSS page associated with this content.
If we look at the definition of MISC_FOOTER in
pages/support/misc.tmpl:
{{define "MISC_FOOTER"}}
<hr>
<footer>
<p style="font-variant:small-caps;">© Fresno Rocked The House In {{year}}</p>
</footer>
{{end}}This is the “year” function defined in pagegen/main.go and discussed
at the beginning of this section. This example shows you how
you can invoke arbitrary go code from within a template during pagegen
processing.
For any project of a reasonable size, such as even the simple Fresno blog engine the ability to avoid repeating yourself in the HTML is paramount.
The static directory
The output of gb seven5 (really pagegen),
for example static/en/web/post/index.html in this lesson,
is placed in the static subdirectory. That directory must be checked
into git as it is the content your web server will respond with when
queried for “/”. In other words, static/en/web/post/index.html will be
visible as “/en/web/post/index.html” when the server is running.
There are files in static/fixed that correspond to assets, like images
or CSS files, that don’t change depending on the language of the user’s
browser or browsing device. Although we only support one language (“en”)
and one device (“web”) right now, the content that might be dependent on
these variables is separated into subdirectories.
Run and test the static files
You should be comfortable enough now to build the fresno application, the migrate application, and the gb seven5 extension anytime, so we won’t call it out anymore.
From now on you must assume that you should run fresno from the primary
tutorial directory (TUTROOT) because
this is how your application will be run on production. Go ahead and start
a copy of fresno running now.
$ cd $TUTROOT
$ fresno
2016/05/10 10:20:00 DATABASE_URL found, connecting to postgres://iansmith@localhost:5433/fresno
2016/05/10 10:20:00 [SERVE] (IsTest=true) waiting on :5000
You can view the static/en/web/post/index.html
index page in your web browser
on the local machine, or on heroku if you are pushing code there. The URLs “/”
and “/posts” are equivalent; they correspond to the same content in
static/en/web/post/index.html and we will explain these URLs in more
detail later.
If you are getting a 404 error in the local case, it is probably because you are not running fresno with the
STATIC_DIRset, orSTATIC_DIRis set improperly.
A Signup Form
Let’s now turn our attention to the
signup form which can be found
in static/en/web/signup.html.
This lesson uses the “fixed form strategy” for dealing with the DOM content. In this strategy, all the HTML/DOM ids (“div#foo”) are known in advance, thus it is easy to “hook up” the interactive parts of the application to the form elements. In more complex interfaces, one cannot know all the HTML ids in advance, because these are calculated at run-time and a different strategy is necessary.
Preparation for this lesson
Make sure Fresno is running and that you see the signup form when you go to /en/web/signup.html.
In your terminal make sure all your client-side (browser) code is built with the commands below. This builds all the HTML and Javascript needed for the program.
$ cd $TUTROOT
$ gb seven5 github.com/seven5/tutorial
Form feedback
The form you should see will look like the image to the right, minus the pink arrows and text which are for this tutorial.
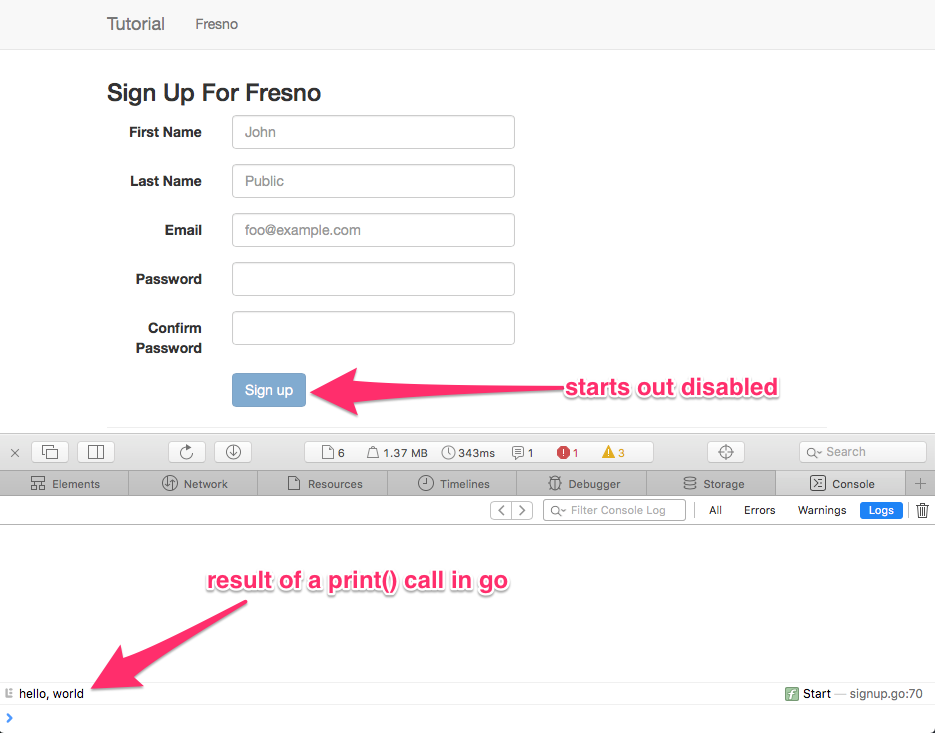
If you don’t have the error console open, as shown at the bottom of the screen cap, you should open it now. You’ll need it. In Safari, you have to access the developer’s menu and select “Show Error Console”. In Chrome you should select “View” then “Developer” then “Javascript Console”.
Typing into the form should give you some feedback in the right-hand portion of the screen. Once you have filled in all the areas of the form and there are no errors, the “Sign Up” button will become enabled. For now, don’t hit the sign up button and just stay on this page.
HTML code
In the pages directory you’ll notice the
pages/signup.html and corresponding pages/signup.json.
We have exploited our “Don’t Repeat Yourself” mantra here. The code for the HTML page is:
<!DOCTYPE html>
<html lang="en">
    {{template "BOOTSTRAP_HEAD_SECTION" .}}

<body>
    <div id="primary" class="container">
    {{template "PAGE_NAV_BAR"}}

    <h3>Sign Up For Fresno</h3>
     {{template "PAGE_ERR_AREA"}}

    <form class="form-horizontal">

        {{template "FORM_5WIDE_TEXT" .first_name}}
        {{template "FORM_5WIDE_TEXT" .last_name}}
        {{template "FORM_5WIDE_TEXT" .email}}
        {{template "FORM_5WIDE_TEXT" .password}}
        {{template "FORM_5WIDE_TEXT" .confirm_password}}

          <div class="form-group">
            <div class="col-sm-offset-2 col-sm-6">
                  <button id="signup" class="disabled btn btn-primary">Sign up</button>
            </div>
          </div>
    </form>

     {{template "MISC_FOOTER" .}}

  </div> <!--container -->
  <div id="secondary" class="container hide">
    <div class="row">
      <h3 class="col-sm-12" class="bg-warning">You are already logged in.</h3>
    </div>
   {{template "MISC_FOOTER" .}}
  </div>

    {{template "MISC_JSLOAD" .}}
</body>
</html>
Since the code for each of the fields on the page is the same, we have factored it
into its own small template in pages/support/form.tmpl.
Then, we re-used that template by changing the JSON:
{
    "title":"Sign Up",
    "css_page": "/fixed/index.css",
    "js_file" : "signup.js",

    "first_name": {
        "id":"first_name",
        "type": "text",
        "label_text": "First Name",
        "placeholder": "John"
    },
    "last_name": {
        "id":"last_name",
        "type": "text",
        "label_text": "Last Name",
        "placeholder": "Public"
    },
    "email": {
        "id":"email",
        "type": "text",
        "label_text": "Email",
        "placeholder": "foo@example.com"
    },
    "password": {
        "id":"password",
        "type": "password",
        "label_text": "Password",
        "placeholder": ""
    },
    "confirm_password": {
        "id":"confirm_password",
        "type": "password",
        "label_text": "Confirm Password",
        "placeholder": ""
    }
}
Note that the HTML page references a different JSON object when invoking “FORM_5WIDE_TEXT” for each form element.
You may find it enlighting to type some random text into the pages/signup.html,
rebuild with gb seven5 github.com/seven5/tutorial and then reloading the page.
Client-side code
Let’s look in a bit more detail at how the client-side Go code gets built.
$ cd $TUTROOT
$ gb seven5 github.com/seven5/tutorial
When the Seven5 extension runs (it is $TUTROOT/bin/gb-seven5) it looks for
go code in the directory client. It is recommended that you keep the structure
of the client and pages parallel, in other words the code in
pages/post/index.html should load the resulting javascript from the go code
that lives in client/post/index.go.
Generally, go expects a directory contain a maximum of one “program” or
main() function in the main package. All of gopherjs, the go tool, and
gb have this property. This makes sense for most situations, but not for us
because each page needs to have a main. So, the Seven5 extension walks all
the go code contained in client directory and its subdirectories and
looks for the main() function. Then it invokes the gopherjs compiler in a
way that allows each file to be its own main. You can have shared support
go packages, as we have with client/uicommon, and the Seven5 extension will
handle this correctly so every main function can use them.
Entry point
Returning to our discussion of the signup page, the code for the
client-side portion of this form is in client/signup.go.
A single HTML page, and its associated state, is represented as an instance of Seven5’s Application interface. There is only one method on Application, the Start() method. This method is critical because Seven5 will do work to insure that this method will not be called before the DOM is fully ready.
Thus in our Go-level “main” for this page (client/signup.go), we just call
s5.Main() with
our Application object, of type “signupPage”:
func main() {
    s5.Main(newSignupPage())
}
If you are familiar with web programming, yes, you can do operations in main() that don’t require the DOM to be available.
Attributes and constraints
Typically, you want to keep page state in your Application object necessary for dealing with later events. Here is the definition of signupPage:
type signupPage struct {
    *uicommon.StandardPage
    first s5.StringAttribute
    last  s5.StringAttribute
    email s5.StringAttribute
    pwd1  s5.StringAttribute
    pwd2  s5.StringAttribute

    firstFeedback s5.StringAttribute
    emailFeedback s5.StringAttribute
    pwd1Feedback  s5.StringAttribute

    alreadyLoggedIn s5.BooleanAttribute
}
An attribute in Seven5 is just a value. We have to use this slightly awkward notation, “s5.StringAttribute”, to represent a string as a value, because attributes have a property that normal Go values don’t have: they can be used as the source or destination for constraints.
A constraint is just a function. Such functions must take in attributes as their inputs and produce a value. It’s called a constraint because Seven5 has machinery that allows it to guarantee that your constraints are always “met”.
For the curious, the algorithm used to insure that constraint evaluation is both correct and close to minimal is eval_vite from 93.
So, how does this work in our example form? First, the first five named
attributes in the signup page structure have their values constrained
to be equal to the values in the type-in fields of the form. The “magic” of
Seven5 is allowing constraints to be computed from parts of the DOM; all the
other constraint processing algorithms/ideas have been
around since the 1990s. Thus, at any point in the code of client/signup.go
the value read from signupPage.first.Get() will be the value that is
currently in the corresponding text box on the screen.
We can also go the other direction! The three fields of signupPage that end in “Feedback” are used to compute the values of the feedback areas to the right of the text entry areas. Again, Seven5 allows constraints to go “into” the DOM as well as come from it. So, a call like signupPage.firstFeedback.Set(“foobar”) will display “foobar” to the right of the first name text entry box and, naturally, signupPage.firstFeedback.Set(“”) will remove what was there before.
To recap the way these eight fields are used in the application: Equality constraints have been placed on the DOM elements for the text entry fields (“input” tags) and on the output areas (“label” tags) such that they remain equal to (have the same string content as) the corresponding fields in the signupPage structure.
Our eight constraints are guaranteed by Seven5, no action is necessary to maintain them once the constraints are established. You can see the constraints being established in the Start() method if you want the details.
Going both ways
Why not combine the two directions of input constraints and output constraints?
func emailFeedback(raw []s5.Equaler) s5.Equaler {
    email := strings.TrimSpace(raw[0].(s5.StringEqualer).S)
    if len(email) == 0 {
        return s5.StringEqualer{S: ""}
    }
    if len(email) < 6 { //a@b.co
        return s5.StringEqualer{S: "That doesn't look like an email address!"}
    }
    if strings.Index(email, "@") == -1 {
        return s5.StringEqualer{S: "That doesn't look like an email address!"}
    }
    return s5.StringEqualer{S: ""} //no error
}
This function is a “constraint function”. It is used to “tie together” signupPage.email and signupPage.emailFeedback. The parameter that comes in (sadly, not strongly typed) is an s5.StringEqualer, which means that it is the value that was produced by an s5.StringAttribute, in this case signupPage.Email. The value returned by this function, also s5.StringEqualer, will end up being assigned to signupPage.emailFeedback.
A very similar function is used to provide the name feedback (nameFeedback() in the source) and the password comparison feedback (pwdFeedback()).
The constraint function below is a function of five parameters, all of them coming from the five “input” attributes that are described above. It produces a boolean in the form of an s5.BoolEqualer:
func formIsBad(raw []s5.Equaler) s5.Equaler {
    firstName := strings.TrimSpace(raw[0].(s5.StringEqualer).S)
    lastName := strings.TrimSpace(raw[1].(s5.StringEqualer).S)
    email := strings.TrimSpace(raw[2].(s5.StringEqualer).S)
    pwd1 := raw[3].(s5.StringEqualer).S
    pwd2 := raw[4].(s5.StringEqualer).S

    if len(firstName) == 0 {
        return s5.BoolEqualer{B: true}
    }
    if len(lastName) == 0 {
        return s5.BoolEqualer{B: true}
    }
    if len(email) < 6 {
        return s5.BoolEqualer{B: true}
    }
    if strings.Index(email, "@") == -1 {
        return s5.BoolEqualer{B: true}
    }
    if len(pwd1) < 6 {
        return s5.BoolEqualer{B: true}
    }
    if pwd1 != pwd2 {
        return s5.BoolEqualer{B: true}
    }
    //enable button
    return s5.BoolEqualer{B: false}

}
This is the function that looks at the form and decides if the Sign Up button should be enabled. This function’s boolean result is connected to the DOM via the CSS class “disabled”. In other words, the guarantee here is that if the value of this function is true (really an s5.BoolEqualer with a B field of true), then the class “disabled” will be present on the button tag. If the value of this function is false, then the tag is guaranteed to not be there. This means that we can now enable or disable (really “not disable” and “disable”) elements of the UI based on constraints.
The Big Win
If you don’t have experience with building web UIs, this may seem like a “small win”.
You should note that the code of client/signupPage.go has no event
handlers. Thus, there are no “callbacks” to handle events, and the
spaghetti code that often results is obviated. (You can create event
handlers in Seven5 applications, but they are needed far less often.)
The most common reason for convoluted event-handling code is attempting to deal with all the possible semantic cases that come from a user input. For example: Do we need to re-compute the value of the enabled/disabled state of the Sign Up button on any keypress in the email field? (Answer: yes.) Do we need to recompute the value of the password feedback field on any keypress in the email field? (Answer: no.) More fun: What if the user adds a space to the end of the last name field? Do we need to recompute the state of the Sign Up button? When you use constraints, you can simply ignore this type of questions.
Constraints are not a free lunch, they require work from you in structuring your application. They require you to think carefully about the inputs and outputs of your user interface, and require clear articulation of the processing to be done. This articulation must be done so that the processing of inputs to outputs can be encoded in constraint functions. Our experience has shown that the effort required to structure a UI with constraints is easily outweighed by the benefits gained in cleaner UI code.
GOPATH and jsmaps
Gopherjs generates Javascript source maps that allows you to debug in the browser at the Go level.
If you look at the developer console in the figure above with the sign up
page, at the right of
the “hello, world” you’ll see “signup.go:70”. (The line
number may be slightly different in your version.) You can click
on it and go to the line in the source code. Seven5 knows how to
interpret the request to show you the source code based on your GOPATH
(set in the enable script). You may find it interesting to look at the
log messages generated by Fresno when you click on a link like this.
If you look at the source code, you’ll notice a couple of differences that are related to coding in a browser:
// called after the DOM is ready
func (s signupPage) Start() {
    print("hello, world")
The function used to print to the console is the Go builtin “print()”, not any of the methods from the log or fmt package. print() is fairly smart and knows how to print complex objects into the Javascript console, so pretty much anything can be printed, although you’ll be looking at the Javascript representation rather than the Go one.
More interesting is to introduce a panic(“foo”) immediately after that print
and then rebuild (gb seven5 github.com/seven5/tutorial in the TUTROOT)
the client-side code. If you
have done this, you’ll see something like this in your browser if you
reload the sign up page:
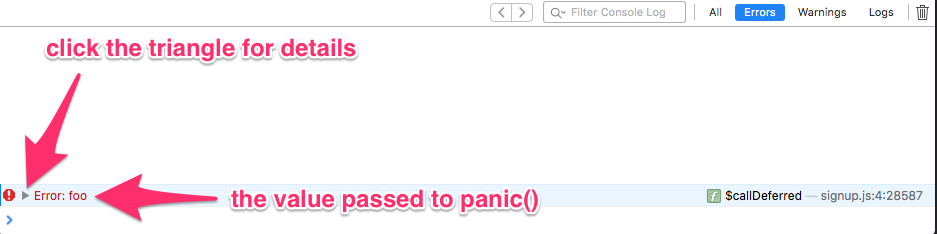
You should click on the little triangle to open up the stack trace. This is the stack trace at the moment of the panic, with the panic error at the top. You’ll usually see a mixture of Go and Javascript code in the stack, since the compiler is generating numerous functions to support your Go code. Although you can look at the Javascript code, don’t bother, it was generated by a machine. The Go source code (indicated by the arrow in this figure) is more interesting:
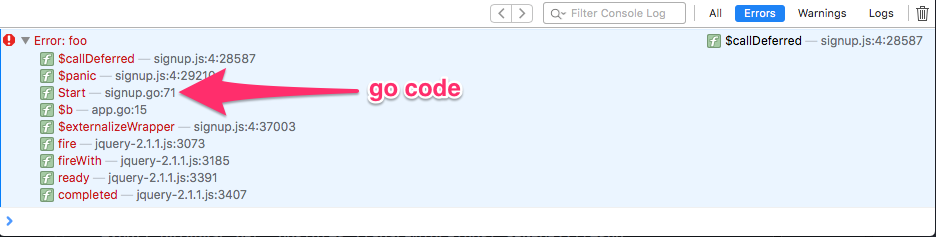
Once you click through the name of a go source code file, you’ll need to “go back” from the source code to the error console and stack trace. There is a “back” button on the debugging are and you need to use this, not the browser “back” button at the top of the window. This is often confusing for people new to debugging inside the browser. If you click on the “app.go” link in that stack trace shown, you’ll be dumped into the Seven5 source code–part of the tool, not part of the tutorial.
Source debugging

The next screenshot shows the source code if you clicked through the link in the previous screenshot labelled “signup.go:70”. You can click in the margin to the left of a line of code to put in a breakpoint. Insert this breakpoint as shown and then reload the page.
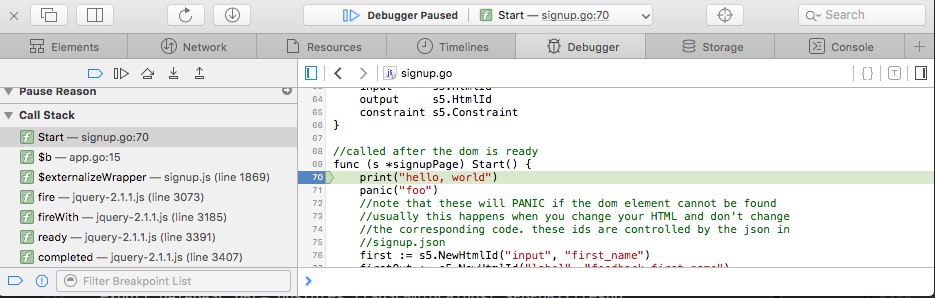
You will see a display somewhat like this one. If you are looking at javascript code, you may need to click on the stack trace at the left to get back to the “right place” in the go code.
You are now in the land of debuggers and most people familiar with them should recognize that they can single step, return from current function, etc. The author doesn’t find a lot of value in source debugging in a browser, but some people are really into debuggers so it seemed a bit callous to not share at least the starting point.
Creating Users
Now that we have looked at the form that takes in a user’s information, we are going to examine how it connects to the server-side code that actually creates new users in the database. This lesson is primarily about not trusting user input.
Preparation for this lesson
You’ll need to have Fresno running for this lesson.
Client side, sending the data
In Start() of the application code, in client/signup.go, there is an event
handling function associated with the user clicking the big blue button:
func (s signupPage) Start() {
    // ... elided for space ...
    button.Dom().On(s5.CLICK, func(evt jquery.Event) {
        evt.PreventDefault()
        var ur shared.UserRecord
        ur.EmailAddr = s.email.Value()
        ur.FirstName = s.first.Value()
        ur.LastName = s.last.Value()
        ur.Password = s.pwd1.Value()
        ur.Admin = true // hee hee hee
        contentCh, errCh := s5.AjaxPost(&ur, "/rest")
        go func() {
            select {
            case <-contentCh:
            case err := <-errCh:
                print("failed to post", err.StatusCode, err.Message)
            }
        }()
It should be fairly clear that this is responding to a click event and copying data out of the form into a instance of the wire type shared.UserRecord. (Attributes and the wire type structures were discussed in previous lessons.) This is then sent to the server with AjaxPost(). The details of the Ajax call will be covered in a future lesson.
Server-side of creating users
The server side is more interesting. As we pointed out in the lesson
on wire types when discussing resources, in freso/main.go we have
informed the dispatcher that we have a Post implementation. This will
be called, via Ajax, when the user clicks the big blue button. We’ll
repeat the call that establishes the connection between the Post (and,
in this case, Find) method and the wire type shared.UserRecord:
    result.base.ResourceSeparateUdid("userrecord",
        &shared.UserRecord{},
        nil, // index
        s5.QbsWrapFindUdid(&resource.UserRecordResource{}, store), // get
        s5.QbsWrapPost(&resource.UserRecordResource{}, store), // post
        nil, // put
        nil) // delete
In the resource implementation, resource/user_record.go, we have implemented
the method PostQbs to handle the information sent from the client.
The server needs to take care to not simply trust the data in “proposed” (did you
spot the “hee hee” moment in the client side?):
func (self *UserRecordResource) PostQbs(i interface{}, pb s5.PBundle, q *qbs.Qbs) (interface{}, error) {
    var ur shared.UserRecord
    proposed := i.(*shared.UserRecord)
    e := strings.ToLower(strings.TrimSpace(proposed.EmailAddr))

    err := q.WhereEqual("email_addr", e).Find(&ur)
    if err != nil && err != sql.ErrNoRows {
        return nil, s5.HTTPError(http.StatusInternalServerError, fmt.Sprintf("couldn't find: %v", err))
    }
    if err == nil {
        return nil, s5.HTTPError(http.StatusBadRequest, fmt.Sprintf(
            "email address already registered %s: %s", proposed.EmailAddr, ur.UserUdid))
    }
    // just to make doubly sure we don't inadvertently trust data from the client,
    // we use the newly created ur which is a zero value at this point
    ur.Admin = false // nuke the site from orbit, it's the only way to be sure
    if strings.Index(e, "@") == -1 {
        return nil, s5.HTTPError(http.StatusBadRequest, fmt.Sprintf(
            "email address not ok: %s", proposed.EmailAddr))
    }
    ur.EmailAddr = e // copy it over
    if len(proposed.Password) < 6 {
        return nil, s5.HTTPError(http.StatusBadRequest, fmt.Sprintf(
            "password too short: %s", proposed.Password))
    }
    ur.Password = proposed.Password // copy it over
    if len(proposed.FirstName) == 0 || len(proposed.LastName) == 0 {
        return nil, s5.HTTPError(http.StatusBadRequest, fmt.Sprintf(
            "bad first or last name"))
    }
    ur.FirstName = proposed.FirstName
    ur.LastName = proposed.LastName
    // XXX this has a race condition which could cause two or more users with same
    // XXX email, right way to fix it is a DB constraint "unique"
    // values are ok, write it
    ur.UserUdid = s5.UDID() // generate a random UDID
    if _, err := q.Save(&ur); err != nil {
        return nil, s5.HTTPError(http.StatusInternalServerError, fmt.Sprintf(
            "couldn't save: %v", err))
    }
    return proposed, nil
}
Testing creating users
If you previously added a panic to the signup page as we discussed in an earlier
lesson on debugging, this would be a good time to remove it. You should be able
to build the client side with
gb seven5 github.com/seven5/tutorial (in TUTROOT) and the
server with gb build github.com/seven5/tutorial.
You can visit the new sign up page here if Fresno is running. You can create users by using the signup form. You can create many users if you log out after creating each one. You may find it interesting to return to the signup page when you are logged in; you’ll have to manually enter the URL since the navigation bar will try to steer you away from this course of action.
Password Authentication: Allow Methods And Sessions
For the avoidance of doubt: authentication is nasty. The reader will likely have noticed that the Seven5 programming model to this point was very clearly differentiated: REST services that communicate via APIs mounted at /rest/resourcename or static files, mounted at /.
Static files are served up in the usual way, with HTTP status code 304 allowing convenient caching, and requests to the APIs in /rest cannot be cached since they are “hot”–can change based on context of the call.
Authentication creates a problem. We are going to be forced to introduce two new “endpoints” in our URL space that are neither fish nor fowl:
- /auth: the place to send data that concerns an attempt to log in or out
- /me: the place to request information about the currently logged in user
Neither of these endpoints can be cached, yet they are not RESTful.
Setup for this lesson
You’ll need to make sure Fresno is running for this lesson.
Then in another window try to retrieve Mary’s record from Fresno, as before:
$ curl localhost:5000/rest/userrecord/515f7619-8ea2-427f-8cf3-7a9201c747dd
Not authorized (FIND, UDID)
Allow methods
Your attempt to retrieve that record has been refused because the implementation of the user record resources uses allow methods to control access to this URL. Since your attempt to hit the server with curl is not authenticated, much less authenticated as Mary, you cannot read this URL.
Allow methods permit coarse-grain policies to be implemented “around” a particular REST resource. Allow methods run before any resource code is executed, and they indicate that access is or is not allowed via their return value. If the return value is false, the resource method is not called at all and an error is returned to the client. The allow methods for a resource that uses UDIDs for resource identity are represented as interfaces in Seven5:
// For POST method to a resource
type AllowWriter interface {
    AllowWrite(PBundle) bool
}

// For INDEX method
type AllowReader interface {
    AllowRead(PBundle) bool
}

// For PUT, DELETE and FIND
type AllowerUdid interface {
    Allow(udid string, method string, pb PBundle) bool
}
By implementing any of these interfaces as part of your resource implementation, you can get the option to “accept or reject” method calls. You are also provided with the parameters that will be sent to the resource method if it is invoked, so you can make decisions based on parameters, sessions, etc.
Each of these methods are provided with a Seven5 Pbundle (pronounced pee-bundell) or parameter bundle. This contains numerous values that have been sent by the client side and will be detailed later. The last method in our code above is provided with the method name (2nd parameter), in uppercase letters, to allow the receiver to discriminate based on the method invoked.
In our implementation of resource/user_record.go we now have
an implementation of Allow that rejects our effort to GET the resource.
// You can only read or update yourself.
func (self *UserRecordResource) Allow(udid string, method string, pb s5.PBundle) bool {
    if pb.Session() == nil {
        return false
    }
    ud := pb.Session().UserData().(*shared.UserRecord)
    return ud.UserUdid == udid
}
This implementation uses the existence of a session in the parameter bundle as a way to see if the user is logged in and, if the user is logged in, checks that the attempt to “FIND”, “PUT” or “DELETE” a record has the same Udid as the logged in user. In other words, only Mary can retrieve info about Mary.
Sessions
Seven5 provides some common utilities for manipulating a session inside the server of an application. The utilities make the assumption that a user that is “logged in” to the application will have one and only one session, even if they have multiple browser windows connected to Fresno. The semantics of “logged in” are defined by the application itself, but typically involve some type of authentication.
For this lesson, we are assuming that the user types in
an email address and a password, sends them to the server, and the
server compares the submitted password to the value it has stored
for that email address. In the successful case, a session is created
as the user data for the session is set to a UserRecord struct,
from shared/user_record.go. If the passwords don’t match, an error
is returned.
The user data associated with a session can be any Go value (it’s an interface{}) but typically what needs to be “hung” on the session is information about the current user. This is what Fresno does.
Session keys
Seven5 uses SERVER_SESSION_KEY to insure that users (client programs)
don’t tamper with their sessions. Only the server knows the
SERVER_SESSION_KEY. Check this lesson’s enable script
(enable-fresno) for the sample value. The user’s browser will
get a cookie named ‘seven5-fresno-session’ that will have an
encrypted value in it. For example, the cookie value might be
something like:
65a16749d4a090d2abcfee571bfc3c7e3264a0a88e2ddd839f25a1a94aadf2c31d80fb62b31ae6657a0f7a2449412a3dd2598a132ae7785feca037ec68764058a7f8
If the client could tamper with this value successfully,
it would allow them to masquerade as any user! The primary benefit
of using this type of encrypted session data is to allow the server
to store a persistent value in the client’s browser–in our case
an email address plus an expiration time–that survives across server
restarts. Although Seven5 maintains the sessions in memory,
we can recover sessions that were created prior to this server’s
process execution if we find a valid cookie. Valid here means
“decrypts to something sensible” using SERVER_SESSION_KEY.
You should pick a key if you plan to use any system like this in practice. You can compile a program called key2hex to do this:
$ cd $TUTROOT
$ gb build github.com/seven5/seven5/key2hex
$ key2hex thisisanexample0
746869736973616e6578616d706c6530
Obviously, you should pick your own password rather than “thisisanexample0”, we recommend using a strong password generator to generate a 16 character password. Then you can use this in your enable script to set the secret for your server.
If you have to change the key for some reason, this is not catastrophic. All previously created sessions will become invalid (and the corresponding users immediately logged out) since their cookie will no longer decrypt to a “sensible” value.
Is this strategy vulnerable to known plaintext attacks? The plaintext can be easily determined from the Seven5 source code, so the scheme appears to have its security resting entirely on the inability of the attacker to generate a “legitimate” cookie value without knowing the secret.
Password Authentication: Client side
Setup for this lesson
You’ll need to have Fresno running for this lesson.
New URLs
Fresno has two authentication URLs that were describe previously as neither fish nor fowl. The first of these, “/auth”, is the authentication point for submitting a username and password. It can also be used for other tasks, such as logging out, that will be explained in later lessons.
The other, perhaps more suprising URL, is “/me” that allows a client to ask the server “who am I?” This uses the cookie stored in the user’s browser explained previously to determine who, if anyone, the current browser is logged in as. You can see try this with curl, of course:
$  curl localhost:5000/me
no cookie
If you change the command above to be “curl -v” you can see that the server is actually returning a 401 error code. This is the cue to Fresno’s user interface to display a page appropriate for a user that is not logged in.
Navigate to the Fresno home page and you will see this:
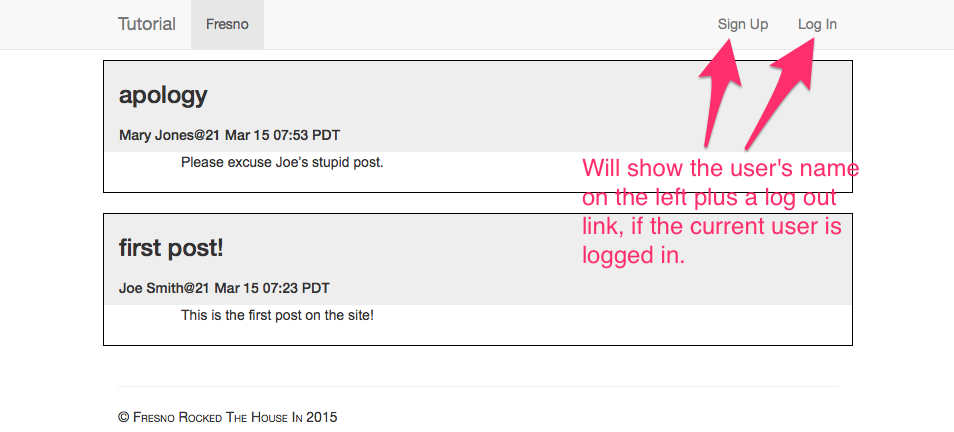
Client-side checking of /me
The implementation of the client-side code for the top right corner of
the page is in client/uicommon/standard_page.go. The function
GetLoggedInUser is responsible for checking the value returned from
/me to see what to display on the upper right corner of the page. This
code is shared among several pages so it has been placed in the
client/uicommon package to do avoid duplication.
There are three common idioms for client-side Seven5 code in the GetLoggedInUser() method, so we’ll reproduce all of it here:
func (self *StandardPage) GetLoggedInUser() {
    chLoggedIn, chLoginErr := s5.AjaxGet(&shared.UserRecord{}, shared.URLGen.Me())
    go func() {
        select {
        case raw := <-chLoggedIn:
            self.user = raw.(*shared.UserRecord)
            self.AddCurrentUserNav()
            self.AddLogOutNav()
            if self.arrivalFunc != nil {
                self.arrivalFunc(self.user)
            }
        case <-chLoginErr:
            if self.includeRightNav {
                self.AddSignUpNav()
                self.AddLogInNav()
            }
            if self.arrivalFunc != nil {
                self.arrivalFunc(nil)
            }
        }
    }()
}
The Ajax idiom
We are sending the server a request for a particular URL, the return value of shared.URLGen.Me() which works out to “/me” (see below for more on URLGen).
This is a common pattern in Seven5 client-side programs:
    channelContent, channelError := s5.AjaxGet(/* wire type, path */)
    go func() {
        select {
        case raw := <-channelContent:
            content := raw.(/* ptr to some content you are expecting */)
            /* create some UI based on the content*/
        case errInfo := <-channelError:
            /* display an error based on the error returned */
        }
    }
A few things to note about this idiom.
- First, the use of select would block, so it must be run inside a goroutine. This is in keeping with the fact that it may take an unknown amount of time for the result of s5.AjaxGet() to return. If you forget to use a goroutine, you’ll get a helpful panic() from the runtime system.
- Second, the wire type for Get must be a pointer to a struct, and the
returned value is unpacked with the
encoding/jsonpackage in the Go stdlib. Any of the special tags on the structure related to JSON decoding apply. For Ajax calls that do not need to send any data to the server, only request data, it is customary to put a zero-valued instance of the wire type as the parameter. We have done this in the previous code snippet for AjaxGet. For calls that do send values to the server, such as AjaxPost or AjaxPut, the content of the first parameter is used to create the body via JSON encoding, but the value must also be a pointer to a struct (a wire type). - Finally, only one of the two channels returned from an Ajax call will receive a value, never both. For the content channel, the caller can safely assume that the value on the channel is the same as the wire type provided in the original call to the Ajax function.
We cannot achieve strong typing with the content channel because Seven5 can’t know the types in your program. Further, we use JSON as the wire format and this breaks some amount of type safety. We encourage folks that are interested in this issue to experiment with using protobufs, gobs, or similar as the transport. This would allow a more “tight rpc style” of calls from client to server rather than the “loosey-goosey” style of JSON. See this example how to use jsonrpc.
The Urlgen idiom
The file shared/urlgen.go declares a single variable URLGen of type
UrlGenerator.
type URLGenerator interface {
    IndexPage() string
    LoginPage() string
    SignupPage() string
    Auth() string
    Me() string
    UserRecord(udid string) string
    UserRecordResource() string
    PostResource() string
    Posts(offset int, limit int) string
    Post(id int64) string
    PostView(id int64) string
    PostEdit(id int64) string
    NewPost() string
}
Much, acutely painful, experience has shown that it is error-prone to have hard-coded string constants that correspond to the URLs in your application. It is downright suicidal to have “fmt.Sprintfs()” that compute complex URLs in your application. Use of such strings makes it hard to change the URL space of your application during development.
Besides the obvious benefit of once and only once, typically the client and server need to share much “logic” around the construction of URLs. For example, you can see above that the URLGenerator for Fresno has a method that allows one to create a URL (really just the “path” part of a URL) for a given UDID, avoiding the deathtrap of having client and server both generating these URLs via strings or fmt.Sprintf().
Since a Seven5 application is Go on both the client and server, you can link the same code into both sides–and breath a sigh of relief that things will stay in sync. As an aside, if you prefer to version your URLs for backward compatibility, this can be accomplished with the use of the URLGenerator idiom.
The parent idiom
It is common in web pages to have some part of the display that cannot be known until data is pulled from the server at runtime. In the example GetLoggedInUser method above, the dynamic portion of the UI is the value (or link) to be displayed in the upper right of the index page. There are four method calls in GetLoggedInUser that affect the display: AddCurrentUserNav, AddLogOutNav, AddSignupNav and AddLogInNav. For space reasons we’ll just show one of these:
func (self *StandardPage) AddLogOutNav() {
    tree :=
        s5.LI(
            s5.A(
                s5.HtmlAttrConstant(s5.HREF, "#"),
                s5.Text("Log Out"),
                s5.Event(s5.CLICK, func(evt jquery.Event) {
                    evt.PreventDefault()
                    self.PerformLogOut()
                }
            ),
        ),
    ).Build()
    self.navRight.Dom().Append(tree) // this is the crucial bit!
}
The “to be determined” bit is encoded in Go code as the variable self.navRight (the right-hand portion of the nav bar). This is referred to as the parent idiom because it is common to have the variable be the parent in the DOM of the content to be added. We used the method Append() in the crucial bit above to append our dynamic content to the child list of the self.navRight element. The parent’s definition is:
self.navRight = s5.NewHtmlId("ul", "nav-right")The call to NewHtmlId searches the DOM for exactly one tag of type
“ul” with Id of “nav-right”. That tag is in the HTML code
(pages/support/page.tmpl) that defines the template
PAGE_NAV_BAR that is used for several of the pages:
{{define "PAGE_NAV_BAR"}}
  <nav class="navbar navbar-default navbar-fixed-top">
    <div class="container">
      <div class="navbar-header">
        <a class="navbar-brand" href="http://seven5.github.io/tutorial.html">Tutorial</a>
      </div>
      <div id="navbar" class="navbar-collapse collapse">
        <ul id="nav-left" class="nav navbar-nav">
        </ul>
        <!-- this is the crucial bit! -->
        <ul id="nav-right" class="nav navbar-nav navbar-right">
        </ul>
      </div>
    </div>
  </nav>
{{end}}
The above HTML code results in no display when the page is initially loaded. The content is filled in once the Ajax call in GetLoggedInUser is completed.
It is important to note that the type HtmlId in Seven5 is aggresive about checking for the existence of the identified portion of the DOM. In the case of the HTML code above, try changing the crucial ul element to be this:
<ul id="xxxnav-right" class="nav navbar-nav navbar-right">This change of the id does not generate a compile time error, sadly, so you can rebuild the code:
$ cd $TUTROOT
$ gb seven5 github.com/seven5/tutorial
If you reload the http://localhost:5000/ page now, and look at the error console you’ll see:
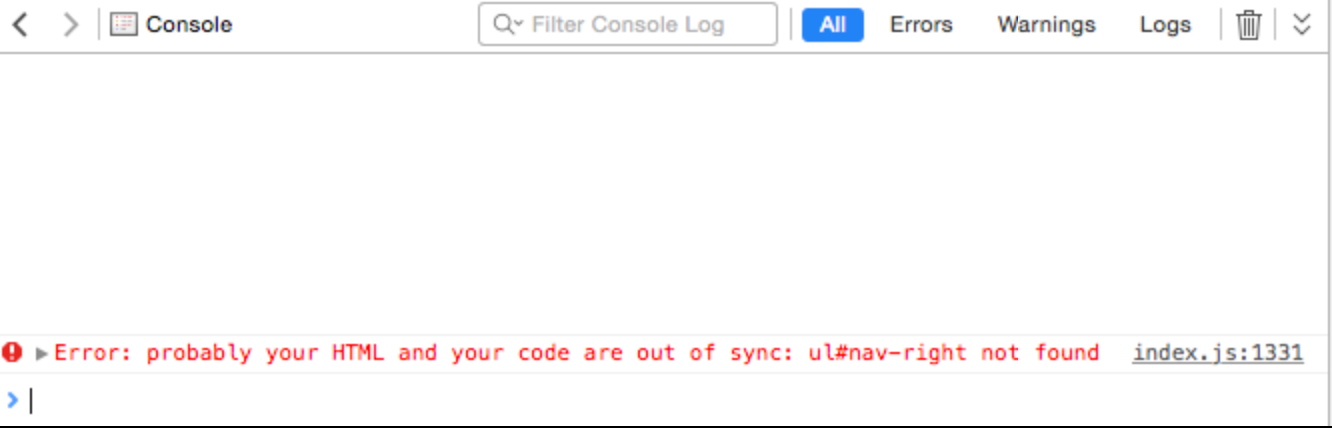
This is only a cross-check between the Go and HTML code, and it’s still possible to get “out of sync” between the two, but this prevents at least some of the most common problems when renaming HTML elements. It can also be triggered intentionally as a “dead HTML code” check.
Password Authentication: Server side
Setup for this lesson
You’ll need to have Fresno running for this lesson.
Performing a log in
With the background covered in the previous two lessions, let’s log in to Fresno.
Don’t forget to change your ul tag in
pages/support/page.tmplback and remove the “xxx” if you made that change in the previous lesson!
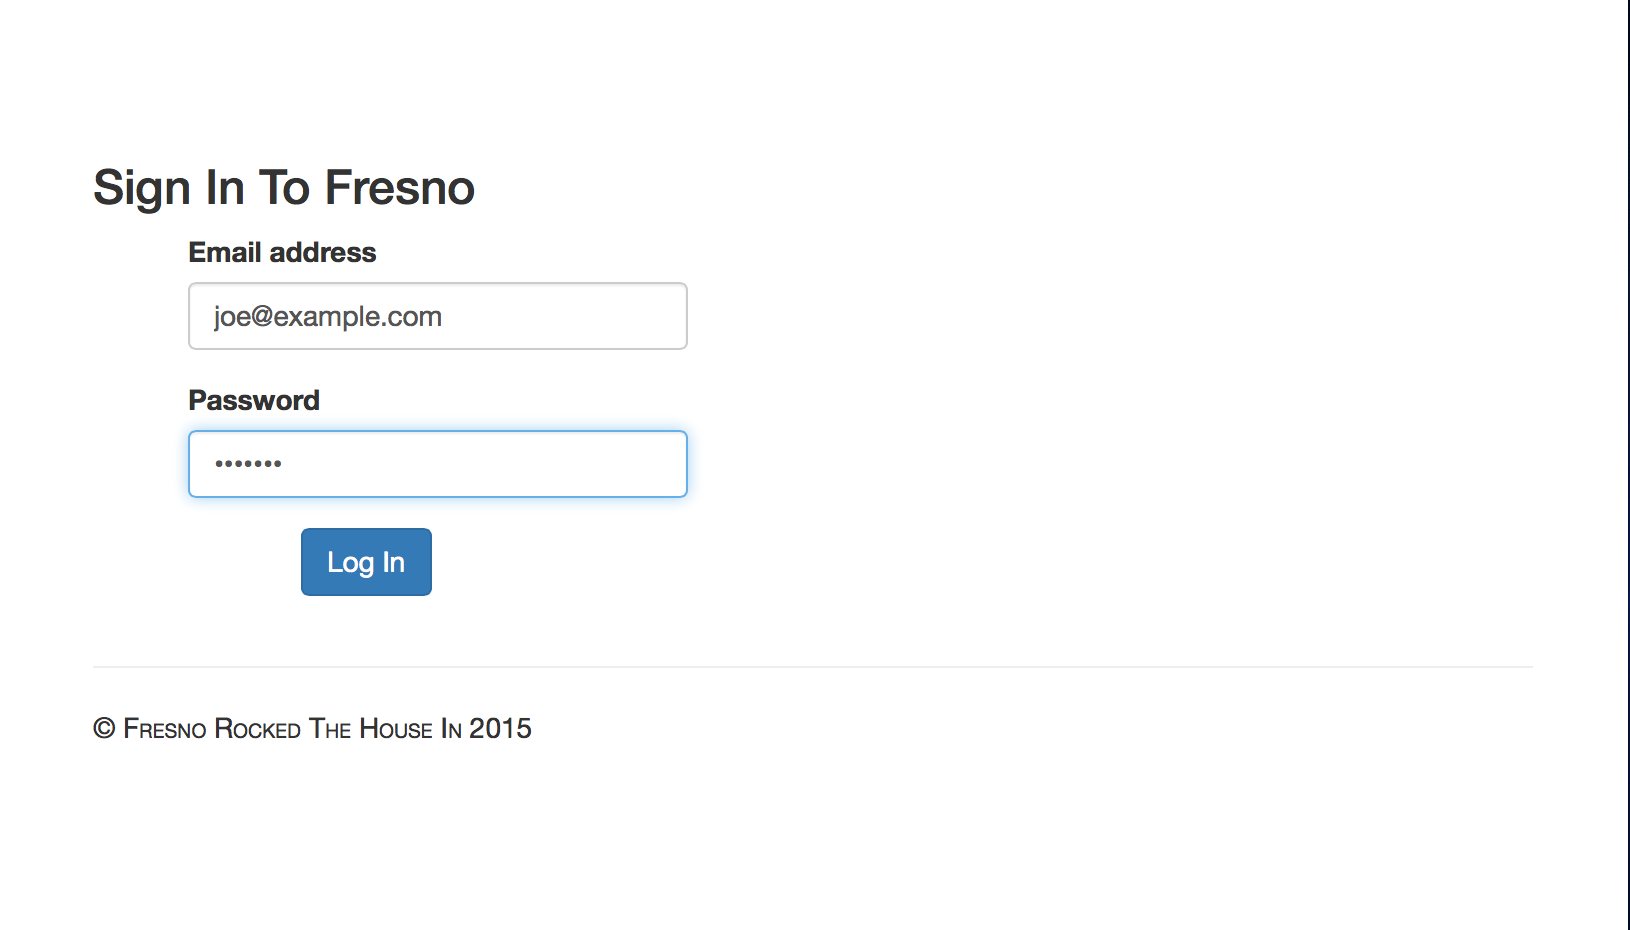
The screenshot above shows the Log In button as enabled, but that does
not happen until you have entered an email address and a password.
Naturally, this is implemented via constraints in
the function formIsBad() in client/login.go.
When you push the button, a bundle is sent to the /auth URL of the
server. This is accomplished by pulling the username and
password out of attributes of the page, encoding a JSON blob, and
the using the Ajax idiom as above. Here is the code for the click
handler of the login page from newLoginPage() in client/login.go:
  button.Dom().On(s5.CLICK, func(evt jquery.Event) {
    evt.PreventDefault()
    var pap s5.PasswordAuthParameters

    pap.Username = result.email.Value()
    pap.Password = result.pwd.Value()
    pap.Op = s5.AUTH_OP_LOGIN

    contentCh, errCh := s5.AjaxPost(&pap, shared.URLGen.Auth())

    go func() {
      select {
      case <-contentCh:
        uicommon.SetCurrentPage(shared.URLGen.IndexPage())
      case err := <-errCh:
        if err.StatusCode == 401 {
          displayErrorText("That's probably not your password.", false)
        } else {
          displayErrorText("Login trouble: "+err.Message, true)
        }
      }
    }()
  })
Two things to note about this code: First, there is no need for any logic for the case where the user tries to click the button without a username or password entered. That cannot happen due to the constraint that enables the button only when the form is populated. Second, success case of the Ajax idiom uses a method SetCurrentPage() in the uicommon package to “brute force” the user onto a different page.
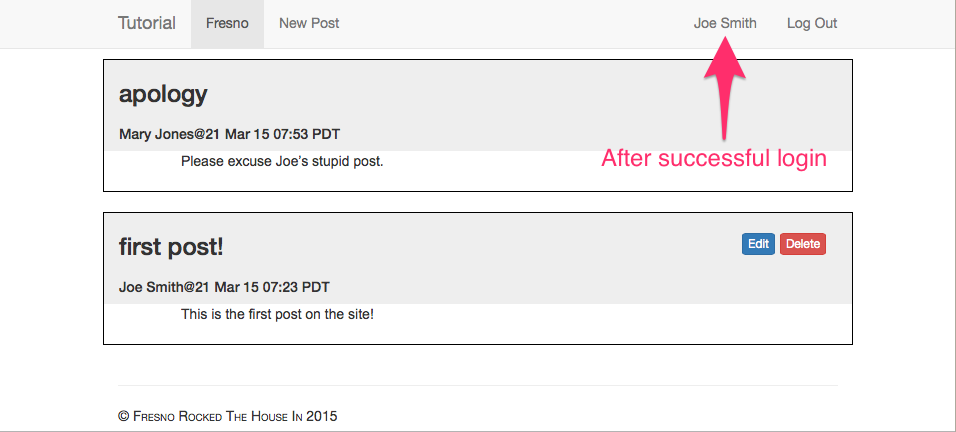
Joe’s password is set in the file migrate/main.go to “seekret”. When
you click the button to log in as joe, you’ll return to the index
page, but it will look like this:
“Simple” in Seven5
When we are discussing the server-side implementation of the password authentication, we’ll refer to some Seven5 types like “SimpleFoo” and the associated interface Foo. In summary:
type Foo interface{
    // methods
}
type SimpleFoo struct{
    // implementation
}
// which could be called, but it would take too long
type FullImplementationOfFooThatsEnoughToStartWithButMightNotBeWhatYouWantLongTerm struct{
    // implementation
}
This naming convention is used throughout Seven5, so you can recognize the intention of many types from their names.
Server side of password authentication
Seven5 has a type SimpleSessionManager that can handle creating and destroying sessions and coordinating this with a cookie maintained on the user’s browser. However, it cannot know the application specific definition of the semantics of “log in”. Seven5 provides an interface ValidatingSessionManager which you can implement and then pass to another Seven5 type: SimplePasswordHandler.
This implies a layering like this, with the implementor in parenthesis:
SimpleSessionManager (seven5)
    MyValidatingSessionManager (you)
        SimplePasswordHandler (seven5)
The Go code basics for this particular layering applied to Fresno is in
fresno/validating_sm.go.
// fresnoValidatingSessionManager knows how to check credentials, interact
// with sessions, etc.
type fresnoValidatingSessionManager struct {
    *s5.SimpleSessionManager
}

// newFresnoValidatingSessionManager creates a new FresnoValidatingSessionManager
// but returns it as an s5.ValidatingSessionManager to insure that we meet the
// interface it requires.
func newFresnoValidatingSessionManager() s5.ValidatingSessionManager {
    result := &fresnoValidatingSessionManager{}
    result.SimpleSessionManager = s5.NewSimpleSessionManager(result)
    return result
}
ValidatingSessionManager
ValidatingSessionManager is an interface to allow you to implement your application-level semantics:
type ValidatingSessionManager interface {
    SessionManager
    ValidateCredentials(username, password string) (string, interface{}, error)
    SendUserDetails(i interface{}, w http.ResponseWriter) error
    GenerateResetRequest(string) (string, error)
    UseResetRequest(string, string, string) (bool, error)
}
We will ignore the password reset code for now, but the methods ValidateCredentials and SendUserDetails are worth discussing now. These methods are used for checking the password and transmitting a user record to the client side, respectively.
Here are the implementations of these two methods from validating_sm.go;
we have removed some of the error checking for clarity:
// Check that a username and password are as we have them in the database.
// If they match, we return the user's UDID as the unique value for the
// session, plus the user data record.
func (self *fresnoValidatingSessionManager) ValidateCredentials(username, pwd string) (string, interface{}, error) {
    q, _ := qbs.GetQbs()
    defer q.Close()

    var ur shared.UserRecord
    u := strings.TrimSpace(username)
    p := strings.TrimSpace(pwd)
    if len(u) == 0 || len(p) == 0 {
        return "", nil, err
    }
    cond := qbs.NewEqualCondition("email_addr", u).AndEqual("password", p)
    if err := q.Condition(cond).Find(&ur); err != nil {
        if err != sql.ErrNoRows {
            return "", nil, err
        }
        // normal case of bad pwd
        return "", nil, nil
    }
    // return the udid as unique part, then the rest of the object as user data
    return ur.UserUdid, &ur, nil
}

// SendUserDetails is responsible for filtering out fields that we may not wish
// to send to the client side of the wire when returning a user record from /me
func (self *fresnoValidatingSessionManager) SendUserDetails(i interface{}, w http.ResponseWriter) error {
    ur := i.(*shared.UserRecord)
    ur.Password = ""
    return s5.SendJson(w, ur)
}
Display Blog Posts, Part 1
Setup for this lesson
You’ll need to have Fresno running for this lesson.
The upside-down tutorial
This tutorial, so far, has not really been about blogging. The first dozen-or-so lessons have been about all the other things that you need to understand to make a real, working application. We have discussed databases, migrations, deployment, dependency management, password authentication, code conventions for a real application, and some REST with a sprinkle of data interchange.
This was by design; most tutorials leave out all the “other stuff” and one ends up with an app that does a few simple things, usually running locally, and then the “hard part” comes when you try to make it real. This tutorial has covered all the hard parts already, now we can focus on getting to the semantics of our application.
Index methods
Index methods are for listing a collection of identical REST resources, such as blog posts. In Fresno, we use a database query to get the list of posts to return to the client side. The index method takes some query parameters to allow the client side to do pagination if it desires. Finally, we do a slight bit of adjustment to the joined user record that represents the author of the post.
The code, from resource/post.go, is:
func (self *PostResource) IndexQbs(pb s5.PBundle, q *qbs.Qbs) (interface{}, error) {
    limit := int(pb.IntQueryParameter(shared.LIMIT_PARAM, 10))
    offset := int(pb.IntQueryParameter(shared.OFFSET_PARAM, 0))
    q, err := qbs.GetQbs()
    if err != nil {
        log.Printf("unable to get db connection:%v", err)
        return nil, s5.HTTPError(http.StatusInternalServerError, fmt.Sprintf(
            "unable to get db connection:%v", err))
    }
    var posts []*shared.Post
    err = q.Limit(limit).Offset(offset).OrderByDesc("created").FindAll(&posts)
    if err != nil && err == sql.ErrNoRows {
        return []*shared.Post{}, nil
    }
    if err != nil {
        return nil, s5.HTTPError(http.StatusInternalServerError, fmt.Sprintf(
            "error in qbs find: %v", err))
    }
    for _, p := range posts {
        author := p.Author
        author.Password = ""
        p.TextShort = markdown(p.TextShort)
        p.Text = markdown(p.Text)
    }
    return posts, nil
}
Joiner
Frequently, you will want a web page to display a series of broadly similar items, such as blog posts in Fresno. Seven5 provides two types that aid in this process: Joiner and Collection. A Collection models a sequence of items to be displayed on the screen and the Joiner does the work of mapping an individual model–an element of the collection– into HTML that should be added or removed from the screen. A Collection must be created with an associated Joiner.
Broadly, the common sequence of actions for displaying a list of items of a resource type:
- Make Ajax call to the server
- Create a model from each result item returned
- Add model to collection
The last of these steps will end up calling the Add() method on the Joiner to display each model on the screen.
Step 2 may seem strange at first, since we are effectively decoding the raw content into one “model”, the wire type used with the Ajax call, and then creating a second model from this first one. This is typically necessary because the “model” in step 2 is an explicit model (in the MVC sense) whereas the model in step 1 just represents what was sent over the wire.
Furthermore. the model in step 2 will typically use attributes because it will need to have these types for connecting to the display. In step 1 a value might be a string, where in step 2 it would be a StringAttribute. Finally, often the display needs are different from the simple values sent over the wire so some processing must be done to the wire types to create the model values in step 3. For example, in Fresno the server sends (wire) the post author’s data as first name and last name, both as strings, but the display wants a single StringAttribute for name.
Building a tree
The first job of a joiner is to build a tree of HTML nodes that can be added to the DOM for displaying the model. Seven5 provides a number of functions to aid in this tree construction process. The functions that create DOM elements are all upper-case names that correspond exactly to the HTML element of the same name. For example:
s5.DIV(
    s5.DIV(
        s5.SPAN(
            s5.Text("foo"),
        ),
        s5.SPAN(
            s5.Text("bar"),
        ),
    ),
)
The snippet above uses formatting to make the tree structure easier to see. This snippet creates a div element, which has a div element as its child, which has two children, both of which are span elements. The span elements each display a constant string of text.
You can easily add some CSS classes to make your HTML tree look nicer when it appears on screen:
var (
    row = s5.NewCssClass("row")
    offset1 = s5.NewCssClass("col-sm-offset-1")
    col10 = s5.NewCssClass("col-sm-10")
)

s5.DIV(
    s5.Class(row)
    s5.DIV(
        s5.Class(offset1)
        s5.Class(col10)
        s5.SPAN(
            s5.Text("foo"),
        ),
        s5.SPAN(
            s5.Text("bar"),
        ),
    ),
)
It is customary to put any CSS classes “first” in the list of decendents from a given node. We have done that above in adding the “row” class to the top level node and two bootstrap classes to the inner div.
This should make it clear that in fact the type of elements passed as parameters to a call like DIV() or SPAN() is dealt with at run-time. There are many different types of things that can be present in the “child list” to a call that creates a node. Let’s bind a click handler for the span “foo”:
var (
    row = s5.NewCssClass("row")
    offset1 = s5.NewCssClass("col-sm-offset-1")
    col10 = s5.NewCssClass("col-sm-10")
)

s5.DIV(
    s5.Class(row)
    s5.DIV(
        s5.Class(offset1)
        s5.Class(col10)
        s5.SPAN(
            s5.Text("foo"),
            s5.Event(s5.CLICK, func(evt jquery.Event) {
                print("clicked foo")
            }),
        ),
        s5.SPAN(
            s5.Text("bar"),
        ),
    ),
)
It is customary to put event handlers such as the one above immediately before any child nodes. If they are placed after child nodes, it becomes hard to see which element the event handler is bound to.
Once you have your tree constructed in code, you typically call Build() on it and add that value to some fixed place on the screen. For example:
var (
    row = s5.NewCssClass("row")
    offset1 = s5.NewCssClass("col-sm-offset-1")
    col10 = s5.NewCssClass("col-sm-10")

    parent = s5.NewHtmlId("div", "item-parent")
)

tree:=s5.DIV(
    s5.Class(row)
    s5.DIV(
        s5.Class(offset1)
        s5.Class(col10)
        s5.SPAN(
            s5.Text("foo"),
            s5.Event(s5.CLICK, func(evt jquery.Event) {
                print("clicked foo")
            }),
        ),
        s5.SPAN(
            s5.Text("bar"),
        ),
    ),
).Build()
parent.Dom().Append(tree)
Binding values from the model
In the client-side code (client/post/index.go) for the index page, we
want to display the title on screen based on the model that
represents what was retrieved from the server.
Given what we have just learned about tree building, here is a real example, part of Add(), one of the two methods (with Remove()) required by the Joiner interface that we are implementing.
func (self *indexPage) Add(i int, m s5.Model) {
    model := m.(*postModel)

    tree := s5.DIV(
        s5.Class(uicommon.Row),
        s5.DIV(
            s5.Class(uicommon.BlogEntry),
            s5.Class(uicommon.Col12),
            s5.ModelId(model),
            s5.DIV(
                s5.Class(uicommon.Row),
                s5.Class(uicommon.Shaded),
                s5.A(
                    s5.HtmlAttrConstant(s5.HREF, shared.URLGen.PostView(model.orig.Id)),
                    s5.Class(uicommon.Col10),
                    s5.Class(uicommon.H3),
                    s5.TextEqual(model.title), // #1
                ),
                s5.SPAN(
                    s5.Class(uicommon.Col2),
                    s5.Class(uicommon.TopSpace),
                    // button section omitted for space
                ),
            ),
            s5.DIV(
                s5.Class(uicommon.Row),
                s5.Class(uicommon.Shaded),
                s5.SPAN(
                    s5.Class(uicommon.Col12),
                    s5.Class(uicommon.H5),
                    s5.SPAN(
                        s5.TextEqual(model.authorName), // #2
                    ),
                    s5.SPAN(
                        s5.Text("@"),
                    ),
                    s5.SPAN(
                        s5.TextEqual(model.date),  // #3
                    ),
                ),
            ),
            // blog content section omitted for space
        ),
    ).Build()
}
The first critical line is the first one where we extract the particular model we are expecting. We cannot get a “tighter” type on the second parameter of Add() because we do not know the types in your program. However, since you do know the types, you can safely cast the second parameter to the type that you know was added to the collection. Non-homogenous collections are possible but not a subject of this tutorial.
Three other critical lines are the three calls to s5.TextEqual(). The TextEqual() method takes a StringAttribute and binds its content to the visible portion (textual part) of the tag it is nested inside. Because this uses constraints, if you change the value in the model, the screen will be updated appropriately.
Sometimes it helps to squint. If you squint when looking at the tree being constructed above, you can see that it forms one large parent div tag that forms a row. The row has a child that is blog entry and covers the whole width of the row (Col12). The blog entry has two children, both DIVs, each of which is a shaded row…
Handling the index method for posts
Returning to our three steps, Fresno loads the blog
posts over the network and displays as per our steps. First it uses
the Ajax idiom in Start() (in client/post/index.go) to
request the posts. At this point, it doesn’t try to do pagination.
If the results are returned successfully, it receives a slice of pointers
to shared.Post() (shared/post.go), a.k.a. a slice of wire types.
It then calls addPost() which takes the new shared.Post() object and
converts it to a postModel, and finally adds that to the collection
of posts.
It is worth noting that the posts collection has to now be initialized when we create the page object. This collection is “per-page state” that exists during the entire time the page is visible in the browser. We mention this per-page state because it is easy to forget about the fact that there is code that must be holding state to make the UI respond to various actions by the user, or data received via the network. Because of constraints, you typically can just build your Seven5 data structures and then let it run.
Creating a New Blog Post
Setup for this lesson
You’ll need to have Fresno running for this lesson.
New Post
Make sure you are logged in as someone. The “New Post” button on the UI is shown to logged in users (more on that later). Click on the New Post button and enter some text into the form. Here is an example that demonstrates that you can use markdown.
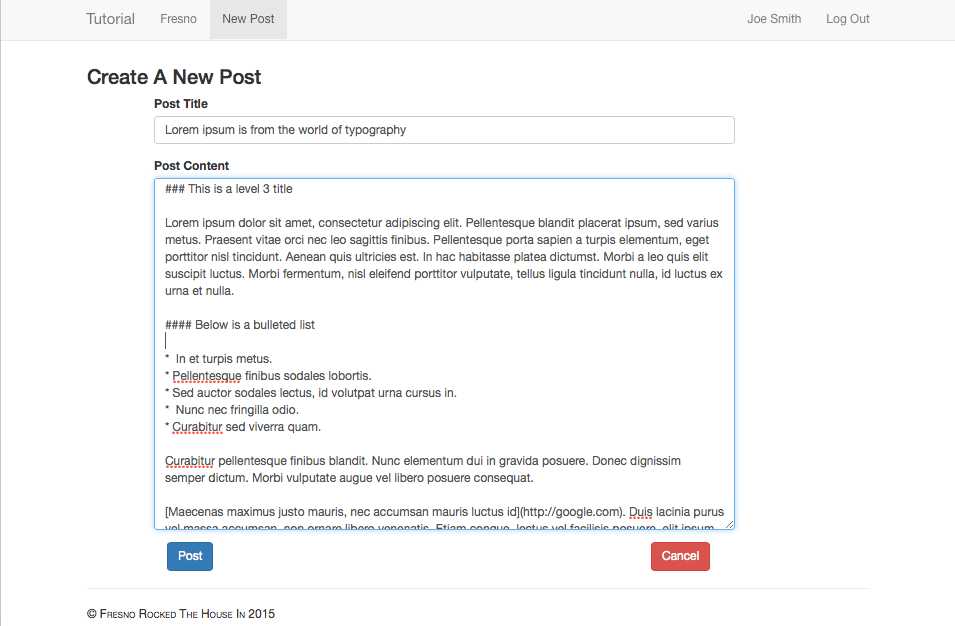
Once you have entered the new post, click the Post button in blue at the bottom left. You should see part of your new post in the list on the index page.
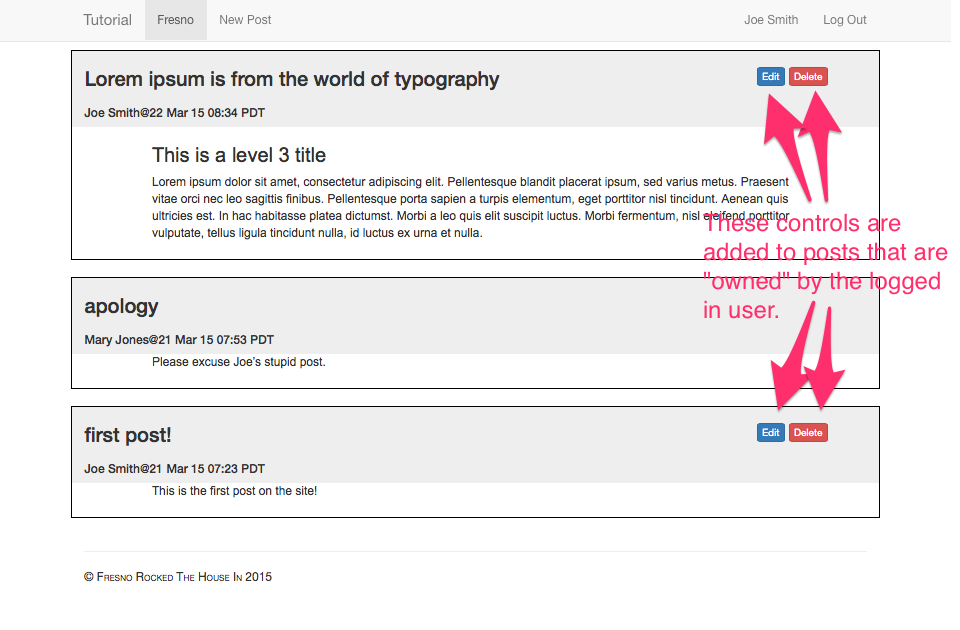
Sharing code
There isn’t much “new” to learn from the particulars of how the client side
posts the content from the form and gets the result. This works in much the
same way as the signup form. The code can be found in
client/uicommon/editpost.go in the method SubmitPost().
Potentially more interesting is the fact that the code is in uicommon in a
file called editpost.go. This is because the page to edit a post and the
page to create a new post are very similar. The only significant difference
from the user’s point of view is that the post’s title and content are
already filled in when editing an existing post. From the code’s standpoint
there is the user-visible difference plus the fact that the REST verb to
be used is POST for creating a new post and PUT for updating an existing post.
Finally, the code must also perform a different action immediately after
a successful new post (return to index page) compared to a successful edit
post (return to show post page).
It is a common problem that you have two very similar pages that need to
share a good bit of implementation. The approach used by Fresno is to create
a very weak “class” in the
Object Oriented
sense. The “class” is defined as this struct in client/uicommon/editpost.go:
// Per-page state, common between "new post" and "edit post" functionality.
type EditPostPage struct {
    *StandardPage

    Title       s5.StringAttribute
    Content     s5.StringAttribute
    SetupFunc   func()
    SuccessFunc func()
    NetworkFunc func(*shared.Post) (chan interface{}, chan s5.AjaxError)

    // private stuff
    errRegion       s5.HtmlId
    errText         s5.HtmlId
    button          s5.HtmlId
    cancel          s5.HtmlId
    titleInput      s5.HtmlId
    contentTextArea s5.HtmlId
    disabled        s5.CssClass
}

// Create a new post
func NewEditPostPage(curr string, setup func(), success func(),
    network func(*shared.Post) (chan interface{}, chan s5.AjaxError)) *EditPostPage {
// omitted for space
}
You can see from the structure definition that there are three
functions, SetupFunc, SuccessFunc, and NetworkFunc. These allow the
callers of NewEditPost to insert (again, weakly) subclass-like behavior
into the EditPostPage implementation. For example, the relevant code
for the new post page is in main() of client/post/new.go where these
three functions are passed as literals:
func main() {
    // create a new instance of the edit/new post page with our choices
    // that are right for new
    ep := uicommon.NewEditPostPage(shared.URLGen.IndexPage(), func() {
        // nothing to do
    }, func() {
        uicommon.SetCurrentPage(shared.URLGen.IndexPage())
    }, func(p *shared.Post) (chan interface{}, chan s5.AjaxError) {
        return s5.AjaxPost(p, shared.URLGen.PostResource())
    })

    // navigation code omitted for space

    s5.Main(ep)
}
There is a similar but slightly more complex version of this call to
uicommon.NewEditPostPage() in client/post/edit.go. It is slightly more
complex because the content to initialize the interface with must be
fetched from the server. By contrast, the code above has the empty function
as its setup function.
Summaries
If you look at the two screenshots from earlier in this lesson, you’ll notice that the text entered in the first was substantially larger than what is shown in the second. You can click on the title of a blog post to see the full blog post or you can use the URL /post/1/view or similar.
In client/uicommon/editpost.go in the method SubmitPost() there is some
code that attempts to “break” a long post into two parts, the summary portion
that is shown on the index page and the rest. It tries to break after a
newline, if possible. The effects of this can be seen in the next lesson.
Display Blog Posts, Part 2
Preparation for this lesson
You’ll need to have Fresno running for this lesson.
Markdown processing
In the implementation of the post resource (resource/post.go) there are
three different ways that markdown is handled. We will examine each in turn.
Index
func (self *PostResource) IndexQbs(pb s5.PBundle, q *qbs.Qbs) (interface{}, error) {
    // database query and pagination omitted for space
    for _, p := range posts {
        author := p.Author
        author.Password = ""
        p.TextShort = markdown(p.TextShort)
        p.Text = markdown(p.Text)
    }
    return posts, nil
}
In the above code from IndexQbs() you can see that the function markdown() is called on both the short (summary part) and long part of the text retrieved from the database. The text stored in the database is always the raw, unprocessed code. The markdown() function uses blackfriday to process the markdown and bluemonday to sanitize the user-generated code. Between these two, the content of the wire type sent back to client has its TextShort and Text fields filled in with HTML code, not the original plain text that was submitted in the form.
This code is actually quite wasteful in that the larger portion of the text that gets processed (the Text field) is not used by the client side and ends up being discared.
Find
func (self *PostResource) FindQbs(id int64, pb s5.PBundle, q *qbs.Qbs) (interface{}, error) {
    var p shared.Post
    p.Id = id
    err := q.Find(&p)
    if err != nil && err == sql.ErrNoRows {
        return nil, s5.HTTPError(
            http.StatusNotFound, fmt.Sprintf("did not find %d", id))
    }
    if err != nil {
        return nil, s5.HTTPError(
            http.StatusInternalServerError, fmt.Sprintf("error in qbs find: %v", err))
    }
    // don't show the password
    p.Author.Password = ""

    _, wantMarkdown := pb.Query(shared.MARKDOWN_PARAM)
    if wantMarkdown {
        p.Text = markdown(p.TextShort + p.Text)
        p.TextShort = ""
    }
    return &p, nil
}
The other two cases are both in the FindQbs() method of the same resource. These two are differentiated by the query parameter markdown, as you can see with the call to pb.Query(“markdown”) that checks to see if that parameter is present (and ignores any value it has). In the case of displaying an existing post for editing, the client side wants the original, unprocessed text. In the case of displaying a full post, with formatting, the client wants all the markdown code processed.
This is accomplished by concatenating the TextShort and the Text field when calling the markdown() function. The concatenation is necessary because the “split” may have done a poor job of choosing the split point. This is ok for the index page since it just shows the “small” portion, but we do not want to have a strange line break in the display of the full, formatted blog entry.
Query Parameters
The code above demonstrates how to handle query parameters on the server side,
via the PBundle. It is worth noting that the query parameter generation is
done on the client side through the URLGen object (shared/urlgen.go). The
method that generates a URL for the REST resource post and a particular id
looks like this:
// compute the REST resource URL for a given post
func (u *urlgen) Post(id int64, wantMarkdown bool) string {
    base := u.PostResource() + "/" + fmt.Sprint(id)
    if wantMarkdown {
        base += "?" + MARKDOWN_PARAM + "=true"
    }
    return base
}
Since the client and server both compile all the code in the shared directory, including URLGen, it is impossible for the query parameter that is being used here, MARKDOWN_PARAM, to get “out of sync” with the code on the server side that uses it in FindQbs.
Displaying HTML
In two places, we must display already created HTML markup. We use our
tree building approach to insert the already created
HTML code into the DOM. Let’s look at the code that displays a full
blog post in client/post/view.go. In displayPost():
func (self *viewPostPage) displayPost(p *shared.Post) {
    tree :=
        s5.DIV(
            // heading rows elided for space
            s5.DIV(
                s5.Class(uicommon.Row),
                s5.SPAN(
                    s5.Class(uicommon.Col12),
                    s5.HtmlConstant(p.Text),
                ),
            ),
        ).Build()
    postParent.Dom().Append(tree)
}
The critical line here is the call to HtmlConstant(). This is a library routine which inserts already created HTML into the DOM as the child of the DOM node which contains the call. This suffixed with “Constant” to indicate that this cannot be constrained to an attributes value, it must be a blob of text.
It seems possible to build a variant of this that would be called HtmlEqual() that could be used with constraints and an attribute string value, to keep an HTML section of the page always up to date.
However, the utility of such of function is dubious, since a more controlled version of this functionality is already possible via the normal tree building mechanism. More generally, inserting big blobs of uninterpreted HTML into the DOM is questionable, be it constant or otherwise.
Controlling The URL Space
Preparation for this lesson
You’ll need to have Fresno running for this lesson.
URLs to static files
You should try typing in some different URLs to see what effect they have on Fresno. Here are some samples (you need to add the http://localhost:5000 in front, of course) for the index page.
- /
- /posts (xxx fix me)
- /posts/
- /posts/index.html
- /posts/index
- /en/web/index.html (this will 404, Not Found)
- /en/web/post/index.html
- /en/web/posts/index.html
- /en/web/posts/
- /en/web/posts (xxx fix me)
For the first blog post:
- /post/1 (xxx fix me)
- /post/1/
- /post/1/view
- /post/1/view.html
All of the URLs in the first set correspond to a single static file,
static/en/web/post/index.html. Note that this is the singular “post”
in the path, not the plural. All of the URLs in the second group
correspond to the single static file static/en/web/post/view.html.
The mapping between URLs that a user types, or links they traverse, to static files is important for three reasons:
-
It is nice for URLs to be “pretty” such as /posts/1/view to show the first post. This pretty URL space also aids in debugging since one can easily construct URLs that correspond to particular back-end entities.
-
We don’t want to duplicate static files, despite the fact that there may be multiple ways in the URL space to access the same logical entity.
-
We want to generate HTTP code 304 for static files when possible. In particular, we want a URL like /post/1/view to not load the fixed part, the HTML content, in
static/en/web/post/view.htmlextra times if it has not changed.
/en/web
The /en/web prefix is currently a placeholder. The “en” represents a language (English) and the “web” represents a display device (standard web browser). In the future, Seven5 intends to support automatic language selection based on the browser settings and automatic device selection based on browser settings, such as switching to “/en/mobile” for a mobile phone-based browser.
StaticComponents
The mechanism in Seven5 for handling the mapping between the URL space and
the filesystem (really the static directory) is
StaticComponent.
This is only for user-visible URLs, not URLs in the REST namespace (“/rest”).
In the setup() function of Fresno (fresno/main.go) there are four statements
of configuration related to StaticComponents:
    // what do we do if given empty URL, note we use the PLURAL here
    homepage := s5.ComponentResult{
        Status: http.StatusMovedPermanently,
        Redir:  "/posts/index.html",
    }
    postComponent := s5.NewSimpleIdComponent("post", existCheck, newCheck, viewEditCheck)
    // SINGULAR for index
    indexComponent := s5.NewIndexOnlyComponent("posts", "post/index.html")

    result.matcher = s5.NewSimpleComponentMatcher(result.cm, result.sm, staticDir,
        homepage, result.heroku.IsTest(), postComponent, indexComponent)
The first statement creates a ComponentResult that specifies what is to occur when the user comes to the homepage (URL is “/”). The middle two lines shown create StaticComponents. The last statement uses those two components as initialization parameters (the last two) in creating a SimpleComponentMatcher.
SimpleComponentMatcher is a utility for serving up static files from a static directory (note the staticDir parameter to NewSimpleComponentMatcher). It has many options but we are primarily interested in how it uses the homepage, postComponent, and indexComponent local variables.
ComponentResult
The variable “homepage” is an instance of the type ComponentResult. A ComponentResult is used when a StaticComponent wishes to communicate with the matcher. It has a number of fields, but generally the most important ones are Status, Redir, and Path. The Status field is an HTTP response code. If the Status code is 200 (OK) then the Path field is consulted for what static content to try to serve. If the Status field is 302 (MovedPermanently) then the Redir field is consulted for what URL the browser should be redirected to. Any other status value is returned to the browser as unchanged, although this usage is rare.
It is important to understand that the Components operate before other processing. In particular, if the user requests a URL such as “/post/1/hackyhack.html” the ComponentResult returned is likely to have Status 200 with a path of “/en/web/post/hackyhack.html”. This will likely fail to serve, and ultimately the user will receive a 404. However, from the Components point of view, that is a perfectly valid URL and so it returns 200 to the matcher and the matcher ultimately sends the bad news to the client. Without this behavior, it becomes problematic to have HTML files that have referencs to support files such as CSS or javascript scripts.
SimpleIdComponent
SimpleIdComponent is a utility for creating a Component that understands URLs like /foo/123/verb. The parameters provided to NewSimpleIdComponent are the part of the URL space (“post” in our example) to use and three functions that provide “checks” on the URL. These are ExistCheck, NewCheck, and ViewEditCheck.
The first of these allows a function to be provided that can check for the existence of a particular id, such as 123. If it fails, the Component will indicate that a 404 should immediately be generated. If it succeeds, processing simply continues. If nil is provided as this check function, processing also continues.
The newCheck and viewEditCheck functions allow some basic permission checking
on URLs such as /foo/123/new or /foo/123/edit. These functions in the case of
Fresno have the same name as their check, and are in fresno/main.go:
// only logged in users can post
func newCheck(pb s5.PBundle) (bool, error) {
    // elided for space
}

//anybody can view a post but to edit you have to be an admin or
//you have to be the owner of the post
func viewEditCheck(pb s5.PBundle, id int64, isView bool) (bool, error) {
    //elided for space
}
If either of these functions returns false, processing stops and the matcher returns false; the user’s browser will receive a 401 response code (Unauthorized).
CookieMapper and SessionManager
If you are wondering why the parameters to NewSimpleComponentMatcher included the application’s CookieMapper and SessionManager, the reason is the PBundle parameter to the functions above. To create a proper PBundle, which may include session data encoded in a cookie, the matcher must interact with the CookieMapper and SessionManager. Put another way, to correctly understand if the URL /foo/123/edit is an acceptable URL, we may need to know who this user is.
IndexComponent
In support of making URLs “pretty”, we can create a component that is responsible
for a given name plus optionally the suffix index.html. This permits the
URLs /posts/ and /posts/index.html to map to static/post/index.html. It is
conventional to use the singular for the path despite the URL, because it
keeps index.html with all the other HTML files associated with a (singular)
post, such as “new.html” or “edit.html”
SimpleComponentMatcher
The type SimpleComponentMatcher is responsible for taking in a URL for content (not a REST resource) and finding the static file to serve. In considering the call to NewSimpleComponentMatcher() at the beginning of this lesson, we have discussed the first two parameters the CookieMapper and the SessionManager. These are needed to support the creation of parameter bundles for verifying access to a particular URL.
The third parameter is a directory (path) that contains the static content,
typically static. The fourth is a hard-coded ComponentResult that should
be used when the user requests the URL /. This is sufficiently common and
important that it was promoted to being a separate parameter.
The fifth parameter is a boolean that indicates if the matcher should be in “test mode”, and if it is in test mode, it will allow access to URLs that start with /gopath, to aid in debugging. Any following parameters are Components to be used in matching against URLs.
Oauth 2
To be done.
Testing
To be done.
Internationalization
To be done.
Building a single image and pulling assets from binary
To be done.
EXERCISES
- Disabled accounts
- GOROOT visible in browser
- Generator for wrapping around Ajax methods and getting the types right
- Generate for creating a new “page” in the application
- Add a dialog box for “are you sure you want to cancel” if post has changes
- Pagination
- Logout